• Link to Mail
  • Link to Facebook
  • Link to X
  • Link to Youtube
  • Link to LinkedIn
  • Link to Yelp
  • OK: 405-905-9175
Home Run Inspections, LLC
  • Home
  • About Us
  • Services
  • What We Inspect
  • Your Report
  • For Agents
  • Testimonials
  • Blog
  • Contact Us
  • Schedule Now
  • Click to open the search input field Click to open the search input field Search
  • Menu Menu

Locating Your Water Shut-Off

February 15, 2021/0 Comments/in Home Safety, Homeowner Tools, On-Going Home Maintenance, Winter Home Maintenance/by sherineprice

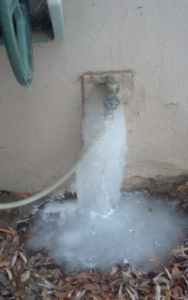
When temperatures rise above freezing,  a significant number of water plumbing problems will show themselves.  When or if a plumbing problem does show up in your home, you will need to know where the water shut-off to your home is located. Due to the number of problems this deep freeze is going to cause, it might be a while before you can get that repair done.  It is a good idea to get the phone number handy for a local, reputable plumber just in case.

Hopefully you already have an idea of where the water shut-off is located.  If you had your home inspected by Home Run Inspections LLC, you got that information from your inspector at the end of your inspection and also have that information in your inspection report.  If you cannot locate your inspection report or email with the inspection report link, give us a call, and we can re-send that to you.

Possible Locations

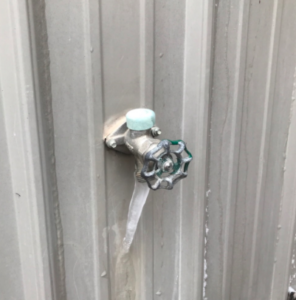
Let’s explore some possible locations.  Fortunately, in many modern homes, it is located on the interior of your home.  Better yet, interior water shut-offs typically require no special tools to operate them. Handles are, in older homes, like that on an exterior hose spigot.  Newer interior valves have a handle that you grab and move about 1/4 turn to the right.

Possible Locations:

  • Street Side Meter Vault
  • Garage
  • Laundry/Utility Room
  • Under the Kitchen Sink
  • Under the Bathroom Sink
  • Hallway Closet
  • Front Bedroom Closet

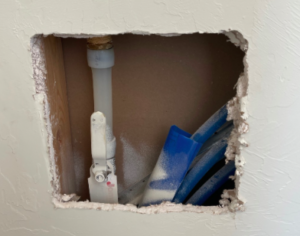
The valve handle may be readily visible, or it may be behind a wooden or plastic door.  These doors are typically located about 12″ above the floor. Although, I have seen them at eye level when the valve is part of what is called a plumbing manifold.

If you have well water, the shut-off valve will be at the well equipment or you can shut water supply off by turning off power to the well head itself.  This breaker is usually located at the electrical panel which is typically located in the garage or on an exterior wall.  It can be located at the well equipment itself if the equipment is in an exterior structure.

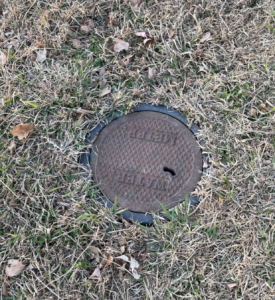
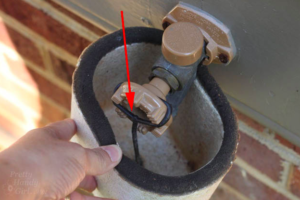
Even if you are fortunate enough to have an interior water shut off that you can access from the comfort of your home without a tool,  your main water shut off is typically streetside at the front of your home.  For a lot of home owners, this is the only water shut off available.  To access this vault, you will need a tool referred to as a church key or water meter vault key.

Tools Needed

The top of this very cool tool looks similar to a flag and is the part that is used to open the lid.  Simply insert and turn. Sometimes you can just lift it off.  Others will require a little finesse to get the mechanism to release the lid.  The U-shaped attachment at the end of the tool. is used to turn the valve at the bottom of the vault.  Fit the attachment on the top of the valve. Then, using the top handles, turn the valve (typically to the right) until you feel a stop.  You should leave a faucet or tub running before going to turn this valve off.  This will allow you to see the meter running at the beginning and then to see it stop when you have successfully closed the valve.

Of course, this process may be above the scope of what you or any member of your household may be able to accomplish.  In that case, call your local water company, advise them of the problem, and they will have someone come out to shut off the water for you.

Hopefully you have found this article helpful.  If so, be sure and share it with friends and family that may find it helpful as well.  At Home Run Inspections LLC, we understand that owning a home is a big responsibility. We do our best at every inspection to help our clients better understand not only any problems that the home may currently have, but also how to manage problems that will likely occur while they enjoy life in the home they have chosen.

At Home Run Inspections we make it easy to get your inspections done. Schedule your inspection online today!

Home Run Inspections, LLC

Oklahoma:  405-905-9175

Info@HomeRunInspections.com

We Cover All the Bases!

Serving the Oklahoma City metro and surrounding areas including Edmond, Yukon, Piedmont, Bethany, El Reno, Tuttle, Mustang, Moore, Norman, Midwest City, Del City, Choctaw, McCloud, Shawnee, Harrah, Newalla, Jones, and more.

Schedule Your Inspections Online at:

Schedule Now

Like us on FaceBook

Follow us on Twitter

Follow us on Instagram


Frozen Plumbing Pipes

February 9, 2021/0 Comments/in Home Safety, Homeowner Tools, Winter Home Maintenance/by sherineprice

Protecting your home from frozen plumbing pipes will save you a lot of money, time and trouble. Winter often means freezing temperatures, unless you live in south Florida. A real “cold snap” can mean outdoor temps will remain below freezing for up to 2 weeks. Wind chill can drop temps to as low as 20 below zero in some areas. Vulnerable plumbing (even in homes or buildings that have never experienced problems), can experience frozen plumbing pipes.

Extra precautions should be taken if you are in an older home. This is especially important if you have a crawlspace. Owners of newer homes or buildings must also be careful not to leave a water hoses attached to their exterior faucets.  They should be covered with some form of insulation as well, particularly if they are on the North side of the home.

Precautions to Take: Exterior

There are a few things you can do to reduce the chance of having frozen plumbing pipes:

  • Disconnect  all exterior water hoses attached to faucets and install an insulated cover over it to help protect it. Pre-made exterior spigot covers are generally readily available and cheap at your nearest hardware store. In a pinch, a towel wrapped around the spigot and secured with duct tape or some type of strap.
  • Cover any open crawlspace vents. Vent Covers are inexpensive and easily installed by the home owner.

Precautions to Take: Interior

  • Set you’re faucets to run at a slow drip. It’s not necessary to turn on all the faucets in your home. Focus on the ones closest to exterior walls. Leave these few faucets on during especially bitterly cold weather. Running water, even a small trickle, can make all the difference.
  • Moving water produces a small amount of heat and is harder to freeze than standing water. Leaving a few faucets running will help prevent ice blockages from forming in your plumbing. Running faucets also relieves pressure build up in cold pipes. This helps to keep your pipes from bursting, even if the water inside freezes.
  • If both hot and cold water lines are exposed, leave both slightly running to make sure pressure doesn’t build up in one and not the other.
  • Use a space heater in the garage or other areas where there is plumbing with no heat source, especially plumbing near exterior walls.
  • Lastly, for good measure, open all the cabinet doors where any plumbing is located to get warm air in there. Again, this is especially important on plumbing near exterior walls.

Cold spells can spell “big bucks” for the plumbing professionals.  I’m all for keeping the small business man in business but, there’s no need to spend that money until you have to, right?  So take a few minutes to get a plan in place to reduce your risk of unnecessary repair costs, and share this article with someone you know that should do the same

Home Run Inspections, LLC

Oklahoma:  405-905-9175

Info@HomeRunInspections.com

We Cover All the Bases!

Serving the Oklahoma City metro and surrounding areas including Edmond, Yukon, Piedmont, Bethany, El Reno, Tuttle, Mustang, Moore, Norman, Midwest City, Del City, Choctaw, McCloud, Shawnee, Harrah, Newalla, Jones, and more.

Schedule Your Inspections Online at:

Schedule Your Inspection Today

Like us on FaceBook

Follow us on Twitter

Follow us on Instagram


Dryer Vent

February 4, 2021/0 Comments/in Home Inspections, Home Safety, Homeowner Tools, On-Going Home Maintenance/by sherineprice

A home encases a variety of systems.  

These systems, by their very nature and design, require regular maintenance.  At Home Run Inspections, LLC, we do our best to educate our clients about the home and the systems they will need to attend to over time:  where the dryer vent is located, where the breaker panel is located, where the sewer clean out is located, for example.

The Dryer Vent

One of the most utilized and arguably most ignored systems in a home, is the dryer exhaust vent.  Depending upon how many people live in a home, this vent is utilized weekly and often several times weekly (if not daily).As a home inspector in Oklahoma City and completing over 100o inspections personally and overseeing over 4000 as a company, I can confidently tell you most dryer vents we inspect have problems.  We have a long list of potential recommendations based on the training we gain as home inspectors, but more importantly, from experience.  Issues range from the most common, a disconnected exhaust pipe in the attic or crawlspace or a missing dryer exhaust, to the more difficult to identify as in difficult to observe obstructions or incorrect vent discharge point.

All of our reports tell you about your dryer vent, what it is composed of and where it discharges.  Our home inspectors like to take a picture of the discharge point, along with an up-view of the vent to identify blockages or missing parts.

Most Common Issue

By far, the most common recommendation is to clear blockages.  I’ve read in more than one place that obstructed dryer vents are one of the most common starting points for residential home fires.

One of the cooler aspects about our jobs as home inspectors in Oklahoma City is discovering innovative ways to deal with common home system problems.  These upgrades often come in the form of a new product offered by service companies, but they often may be a resolution created by the home owner.

Innovative Practices

The above photos show an ingenious way to slow the accumulation of lint in the dryer vent pipe.  A common problem for a typical home concerns the vent pipe.  Hot moist air is carried through the cool, unconditioned space(the attic) during the winter.  This can cause build up of lint as condensation on the inside of the pipe.

I’ve also seen a booster fan mechanism that you can insert in the pipe to help move the moist air to the discharge point more quickly and presumably reducing problems.

Which brings us to one of the most important aspects of the dryer vent system; the exhaust vent exterior.

Exhaust Point

This is a point that also often experiences a collection of moist lint over time, and thus an obstruction. This point is often at the roof. It can also be other locations such as an exterior wall, roof soffit, or even the crawlspace.

As you can see, out of sight out of mind does not always end well.  Moisture and lint in the attic or crawlspace is a no-no. Exhausted air should always discharge to the exterior.

Take a look at our Report process for insights on how we really go the extra mile to tell you all about your potential purchase.

Keep us in mind when you or someone you know needs a residential or commercial property inspection. Scheduling is a breeze on our website 24/7 in the Oklahoma City Metro or Florida Panhandle.

We look forward to exceeding your expectations while we Cover all the Bases!

Home Run Inspections, LLC

Oklahoma:  405-905-9175

Info@HomeRunInspections.com

We Cover All the Bases!

Serving the Oklahoma City metro and surrounding areas including Edmond, Yukon, Piedmont, Bethany, El Reno, Tuttle, Mustang, Moore, Norman, Midwest City, Del City, Choctaw, McCloud, Shawnee, Harrah, Newalla, Jones, and more.

Schedule Your Inspections Online at:

Schedule Your Inspection Today

Like us on FaceBook

Follow us on Twitter

Follow us on Instagram


Covering All the Bases

January 28, 2021/0 Comments/in Home Inspections, Home Safety, Homeowner Tools, On-Going Home Maintenance/by sherineprice

(termite tubes in a locked exterior mechanical closet)

Oklahoma Standards of Practice

As a licensed home inspector, we follow the State of Oklahoma Standards of Practice.  There is a long list of systems that we inspect and describe at a home inspection.  Covering all the bases includes the big systems you would think of like the roof, plumbing, electrical, and structure.  A good home inspector is a strong sense of curiosity along with an educator’s heart.

There are a lot of things to inspect on homes that are not covered by Oklahoma’s Home Inspector SOPs.  For example, home inspections do not cover (unless contracted to) termites, pool and spa systems, well and septic systems, sewer lines, and in-slab HVAC ducts to name a few.  Home buyers often want and need these systems inspected.  That creates a lot of extra work for the buyer and or their agent to make sure all of these specialists show up at the same time.

(object puncturing sewer line creating an obstruction and waste leak into the yard)

Covering All the Bases

As a business owner in Oklahoma City, I saw early on that it would be a lot easier on customers for our company to incorporate those other inspections into our Home Inspection services offered.  It’s been a challenge as a Home Inspector to learn about all of these other systems. Not only have we completed the course work, but have received hands-on training from the experts.  I believe we have done a great job of becoming the  One-Stop-Shop that makes the home buying process far less complicated.

We now have the equipment to provide all kinds of inspections(cover all the bases) that you may need for your inspection.  These include pool and spa, well and septic, duct and sewer scoping, Indoor Air Quality test, and more.

Home Run Inspections, LLC

Oklahoma:  405-905-9175

Info@HomeRunInspections.com

We Cover All the Bases!

Serving the Oklahoma City metro and surrounding areas including Edmond, Yukon, Piedmont, Bethany, El Reno, Tuttle, Mustang, Moore, Norman, Midwest City, Del City, Choctaw, McCloud, Shawnee, Harrah, Newalla, Jones, and more.

Schedule Your Inspections Online at:

Schedule Your Home Inspection Today!

Like us on FaceBook

Follow us on Twitter

Follow us on Instagram


Trash Compactors

August 27, 2018/in Home Safety, Homeowner Tools, On-Going Home Maintenance/by Scott Price

Why Use a Trash Compactor?
Permanently installed residential trash compactors run on electricity and use a small hydraulic system to crush trash down to a fraction of its original volume (sometimes down to 25%) in order to reduce the amount of non-biodegradable waste regularly generated by a household.  Smaller and narrower than a dishwasher, they are a standard kitchen appliance in new-construction homes.

How They Work
Trash compactors have three main components:  the motor; the ram; and the trash container drawer.  The motor runs using household electricity, which activates the ram that is operated using hydraulics.  Units vary by size, quality and cost.  The loading capacity for the average home unit is generally around 25 gallons, and the compacting force can range between 2,000 pounds to 5,000 pounds, depending on type and quality.

Most units must be at least half full in order to work properly.  To use the unit, non-food refuse should be placed or stacked neatly at the bottom of the drawer.  When it is at least half full, the unit can be activated so that the ram compacts the drawer’s contents.

Safely Disposing of Household Trash
Generally, bottles, cans, cardboard, paper and plastic items and the like can be conveniently disposed of in a trash compactor.  In order to minimize odors, containers that once held food and beverages should be rinsed before being placed in the drawer.

Trash compactors require the use of specially-fitted bags that, once filled, easily lift out of the unit for disposal or trash pickup.

Perishable food items can stain the unit’s interior and create unnecessary mess and foul odors, which is why they should not be disposed of in a trash compactor.  These types of items should be discarded using a garbage disposal or food grinder, or recycled as compost waste.

Additionally, hazardous materials should never be placed in a trash compactor, as crushing them can have unintended consequences that can damage the unit, create an unsafe environment, and/or cause negative health effects.  These include batteries, cigarette butts (which may not be fully extinguished), household rags used with toxic substances, cans and containers that held hazardous liquids and chemicals (as residue can spill out and cause damage or negative health effects), and similar items.  These should be wrapped and disposed of separately, or recycled according to local guidelines or ordinances.

Safety Precautions and Sensors
As a safety precaution, trash must never be stuffed down into the bottom of the drawer with one’s hands or feet, as this can dent or offset the drawer and its rollers, as well as damage the hydraulics. Rough use and frequent misuse can lead to chronic problems with the unit and its components.

Caution should be used when removing filled bags, as items that have been crushed may create sharp protrusions.  Many people wear gloves while removing bags for disposal.

The unit should always be locked, even when not in use.  Curious children may wish to pull open the drawer and hide inside, or activate the unit, which is why they should never be left unattended around an unlocked trash compactor.

Spills around the unit should be immediately cleaned up for safety as well as hygienic reasons.  Because trash compactors use electricity, spilled water or other liquids can cause the unit to short out or create an unsafe hazard for users.

Trash compactors have built-in safeguards, such as locks, misload sensors, tilt sensors, and drawer-monitor switches, which are designed to help prevent injury, over-filling and under-filling, as well as detect when trash has been accidentally placed within the unit but outside the drawer (such as behind the drawer where the ram and hydraulics are located).  However, because they are constructed of many mechanical parts and electrical wiring, trash compactors can malfunction and chronically break down if not used and maintained properly.
Repairs and replacing parts should be performed by a qualified professiona

Home Run Inspections
405-905-9175, 850-203-3239
Info@HomeRunInspections.com
We cover all of the bases!

Serving: Oklahoma City, Edmond, Yukon, Moore, Norman, Purcell, Midwest City/Del City, Bethany, El Reno, Shawnee, Harrah, and more.

Schedule your inspections now Online at:

Schedule Now!

Follow us on 

Like us on FaceBook
Follow us on Twitter

Follow us on Instagram: Instagram 


Garbage Disposals

August 24, 2018/in Home Inspections, Home Safety, Homeowner Tools, On-Going Home Maintenance/by Scott Price

What Are Food-Waste Disposers?
Garbage disposals, also called food-waste disposers, are residential appliances designed to shred food waste so that it can fit through plumbing. They are usually electrically powered (although occasionally powered by water pressure) and are installed beneath sinks. As a home inspector, we always inspect this appliance.

Why Use a Garbage Disposal?
When food waste is discarded into the trash, it places an enormous burden on waste-management systems. Garbage disposals reduce the severity of these problems by routing food waste into septic systems or sewers instead of landfills.

Garbage Disposals and Septic Systems
If a garbage disposal discharges into a septic tank, it can place significant strain on the septic system. We really don’t see this in Oklahoma City very much. The amount of waste that enters the tank, particularly grease and suspended solids, will increase considerably. This load increase requires that the septic tank be pumped more often than would otherwise be required. The additional strain will also reduce the lifespan of the septic system. Septic systems can be designed to accommodate food waste, but, in general, they are not.

Electrical Wiring Requirements

  • The National Electrical Code (NEC) does not require a garbage disposal to have GFCI protection.
  • The vibration caused by the operation of a garbage disposal can cause electrical connections to separate. Check for any loose connections in the wire compartment box at the base of the disposal.
  • Garbage disposals should be either hardwired or connected to an outlet through a grounded electrical outlet.
  • A dedicated circuit is generally recommended, although a circuit that is shared with a dishwasher is sometimes appropriate. The disposal’s user or installation manual should be consulted.

Precautions for Testing Garbage Disposals:

  • To test a garbage disposal for leaks, turn it on and run water through it. The water load should be great enough so that any leaks will become apparent. A good way to do this is to close the drain and fill the sink with water before releasing the stopper.
  • While testing a garbage disposal, never put anything other than water through it. Before turning it on, check to make sure there are no objects already in the disposal.
  • If a dishwasher is connected to the disposal, make sure that the line that connects them is securely attached.
  • Check to make sure that the garbage disposal is connected to a drain that is 1½ inches or greater in diameter.
  • Check to make sure that the disposal is provided with an adequate water supply.
  • If the home has a double sink, check to make sure the waste pipe from the disposal has a trap installed.

Maintenance and Operation Suggestions:

  • Put only small quantities of food into the disposal at a time. Large food scraps should be cut into smaller pieces before entering the disposal.
  • Never put anything down the disposal that is not food or water. Bottle caps, aluminum foil, and other non-food items can damage the disposal or get stuck in the plumbing piping.
  • Run water while using the disposal and for approximately 30 seconds after you turn it off. Food scraps will flow through the piping more easily if they are pushed along by water. Cold water is better than warm water for this purpose because it will force fats and grease to congeal and harden, allowing them to move more easily through pipes. Warm water can be run through the disposal while it is not in operation.
  • Ice can be used to clear off solidified grease and other debris from the blades in a garbage disposal.

The garbage disposal should be used to grind only non-fibrous, leftover food. If in doubt as to whether something can be put in the disposal, err on the side of caution and put it in the trash instead.
The following items should never be put in a disposal:

  • items that are hard enough to dull the blades, such as shells from shellfish or bones;
  • food that is highly fibrous, such as corn husks, artichokes, pineapples, potato peels, asparagus, or celery, which should enter a disposal only in small quantities or disposed of in the trash. These foods take a long time to grind and can clog the disposal or the plumbing;
  • grease and household oils; or
  • chemicals.

Garbage disposals have the potential to limit the amount of household trash that must be taken away to waste management facilities. They can also place additional strain on septic systems and, for this reason, they should be used infrequently

Home Run Inspections, LLC

Oklahoma:  405-905-9175

Info@HomeRunInspections.com

We Cover All the Bases!

Serving: Oklahoma City, Norman, Yukon, Piedmont, Purcell, Bethany, El Reno, Tuttle, Mustang, Moore, Edmond, Midwest City, Del City, Choctaw, McCloud, Shawnee, Harrah, Newalla, Jones, and more.

Schedule Your Inspections Online at:

Schedule Now

Florida Scheduler 

Like us on FaceBook

Follow us on Twitter

Follow us on Instagram


Dishwashers

August 21, 2018/in Blog, Home Energy Efficiency, Home Safety, Homeowner Tools, On-Going Home Maintenance/by Scott Price

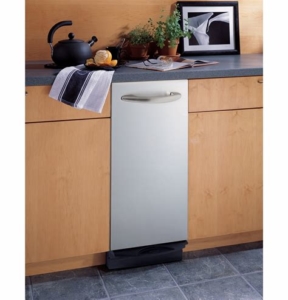
How Does a Dishwasher Work?
Dishwashers are labor-saving and water-conserving appliances that were first invented in the U.S. in the 1850s.  There are both portable units and permanently installed units that are found in most homes today.
Home Inspectors always inspect dishwashers. Permanently installed dishwashers rely on the home’s electrical and plumbing systems, which is why their proper operation and maintenance are critical to household safety and trouble-free use.

A dishwasher operates with sprayed water using multiple cycles of washing and rinsing, followed by drying, using hot, forced circulated air.  These cycles may be further distinguished according to length of cycle, power and temperature.

Dishwashers are plugged into a dedicated electrical receptacle at the back of the unit, and usually plumbed into the home’s hot water supply, although the cold water supply is also an option.  This assures that the dishwasher’s load is optimally washed and rinsed using the maximum recommended temperature range of between 130°  F and 170° F.

The dimensions of an average unit are 24×24 inches, although deluxe models may be wider and/or deeper to accommodate larger loads.  Its interior components are typically made of stainless steel and/or plastic, and the exterior door may be metal, enamel-covered metal, or having a wood or wood-like veneer to match the decor of the kitchen cabinets.

Use, Maintenance and Precautions
Dishwasher-safe glasses, cups, plates, bowls, pots, pans and utensils, as well as some ceramic-ware and cutlery, are loaded into pull-out racks and baskets.  They can be safely washed and rinsed in cycles that vary in intensity and length.

Many users rinse, soak or pre-treat cookware to remove solids and excess food waste before loading it in the dishwasher; this is a matter of personal preference, as well as how well the unit works on everyday and heavy-duty loads, although waste that cannot be adequately drained should be removed from dishware before the soiled items are loaded into the unit.

Dishwashers can also be used to effectively disinfect toothbrushes, infants’ plastic toys, formula bottles and synthetic nipples, and teething rings, as well as other household and personal hygiene items. However, extremely soiled items that come into contact with potentially hazardous or toxic materials, such as tools, gardening implements and the like, should not be washed in a dishwasher, as the toxic residue may not fully rinse out of the interior, which can contaminate future loads of dishware and utensils, as well as clog plumbing lines.

Soaps, pre-treaters and rinsing agents to prevent or eliminate water spots are available in a variety of costs, quality and effectiveness.  They also come in both powder and liquid form.  Regardless of the type of detergent used, it should be specifically for dishwasher use only, as other soaps can leave behind residue, as well as create excess foam and leaks.

Maintenance is relatively easy and can be done by running the unit through a hot-water cycle while it is empty, but this is only suggested following an especially dirty load where residue has not fully washed and drained for some reason.

Dishwashers should never be overloaded.  Loads should be distributed and racked such that cleaning will be effective.  It is recommended that plastic items be loaded into the unit’s top rack to avoid their coming into contact with hot elements in the unit’s bottom and then melting, or being jostled by the power of the sprayers and subsequently blocking them, which may prevent the water from reaching the unit’s entire load.

It is important to monitor the unit for failure to fully drain, as well as for leaks, excessive noise and movement, and burning smells, which can indicate a burned-out motor, an issue with the plumbing connected to the unit, or a problem with its original installation.  A qualified professional should evaluate a malfunctioning unit and perform any repairs

Home Run Inspections
405-905-9175
Info@HomeRunInspections.com
We cover all of the bases!

Serving:  Oklahoma City, Edmond, Yukon, Moore, Norman, Purcell, Midwest City/Del City, Bethany, El Reno, Shawnee, Harrah, and more.

Schedule your inspections now Online at:

Click to Schedule Now

Follow us on 

Like us on FaceBook
Follow us on Twitter

Follow us on Instagram: Instagram 


Kitchen Sink

August 18, 2018/in Blog, Home Safety, Homeowner Tools, On-Going Home Maintenance/by Scott Price

Sinks are a category of plumbing fixtures that includes kitchen sinks, service sinks, bar sinks, mop sinks and wash sinks. A sink is considered a different item than a lavatory (or a bathroom sink), although the terms are often used interchangeably. Sinks can be made of enameled cast-iron, vitreous china, stainless steel, porcelain-enameled formed steel, non-vitreous ceramic, and plastic materials.

Sink waste outlets should have a minimum diameter of 1-1/2 inches. Most kitchen sinks have an opening of 3-1/2 inches in diameter. A food-waste grinder has a standard opening of 3-1/2 inches, and so do most kitchen sink basket strainers. A strainer or crossbar should be provided to restrict the clear opening of the waste outlet.

Plumbing Requirements for Garbage Disposals
Food-waste grinders (also known as garbage disposals and disposers) are designed to grind foods, including bones, into small-sized bits that can flow through the drain line. Using them to dispose of fibrous and stringy foods, such as corn husks, celery, banana skins and onions, is not recommended because fibers tend to pass by the grinder teeth, move into the drain pipe, and cause drains to clog.

Water must be supplied to the grinder to assist during its operation in transporting waste. The water flushes the grinder chamber and carries the waste down the drainpipe. Blockage may result if the grinder is used without running the water during operation. Grinders should be connected to a drain of not less than 1-1/2 inches in diameter. Food-waste grinders are supplied with water from the sink faucet. They do not add to the load used to compute drainage pipe sizing. The drain size required for a grinder is consistent with that for a kitchen sink.

Plumbing Requirements for Dishwashers
The water supply to a residential dishwasher should be protected against backflow by an air gap or backflow preventer. The machine must be equipped with an integral backflow mechanism, or the potable water supply must have either a backflow preventer or an air gap. The discharge pipe from the dishwasher should be increased to a minimum of 3/4-inch in diameter. It should be connected with a wye fitting to the sink tailpiece. Before connecting to the sink tailpiece, the dishwasher waste line should rise and be securely fastened to the underside of the counter. The combined discharge from a sink, dishwasher, and waste grinder is allowed to discharge through a single 1-1/2-inch trap.

Maintenance Tips
Homeowners should take care not to overload the garbage disposal or the dishwasher, as this can lead to leaks and backups in the sink and the plumbing system.  A backup at the kitchen sink may mean that the garbage disposal is clogged, or the plumbing line has some obstruction that prevents proper drainage.  It’s important that homeowners understand the cause of the problem, as well as the proper way to repair it, before dismantling pipes under the sink.  The right size of fittings and replacement parts, as well as proper drainage (including slope and traps) will ensure that the sink will work as it should following a repair, which is why most maintenance issues are best left to professionals, unless the homeowner has the proper instruction, parts and tools available.

Home Run Inspections, LLC

Oklahoma:  405-905-9175

Info@HomeRunInspections.com

We Cover All the Bases!

Serving: Oklahoma City, Edmond, Yukon, Piedmont, Bethany, El Reno, Tuttle, Mustang, Moore, Norman, Purcell, Midwest City, Del City, Choctaw, McCloud, Shawnee, Harrah, Newalla, Jones, and more.

Schedule Your Inspections Online at:

Click Here to Schedule Now!

Like us on FaceBook

Follow us on Twitter

Follow us on Instagram


Roof Maintenance

July 30, 2018/in Autumn Home Maintenance, Blog, Home Safety, Homeowner Tools, On-Going Home Maintenance/by Scott Price

Roof-Covering Maintenance

Although homeowners aren’t necessarily expected to climb on their roofs every season as part of regular home maintenance, there are some conditions that should be monitored to prevent roof damage and to help you get the longest life out of your roof-covering materials. Certain types of damage can lead to water and pest intrusion, structural deterioration, and the escape costly energy. A home inspector will call out these issues on a home inspection.

Weathering
Hail and storm damage, known as weathering, can weaken a roof’s surface even if you haven’t lost any shingles/shakes/slates following a storm. It’s the most common source of environmental damage for roofs. Strong, sustained winds can cause uplift to the edges of shingles and shakes, which can weaken their points of attachment and allow rainwater and melting snow to reach the roof’s underlayment. Wind can also send projectiles through the air, which can damage every surface of the home’s exterior, including the roof. In Oklahoma City especially, you should always inspect your roof after a heavy weather event, as far as it is practical to do so without taking any undue risks, to check whether you have lost any roof-covering materials, or if any parts look particularly weathered or damaged. A small fix now could prevent costly repairs later.

roof with tree damage

Tree Damage at Roof

Tree Damage
Tree damage results from wind-blown tree branches scraping against shingles and from the impact of falling branches blown by wind and/or because the nearby tree has dead branches that eventually break off and fall. Branches that overhang the roof should always be cut back to avoid damage from both abrasion and impact, and to prevent the accumulation of leaf debris on the roof, its valleys, and in the gutters, which will interfere with proper drainage and lead to pooling of rainwater and snowmelt. Of course, it’s especially important to make sure that tree limbs near the home’s roof and exterior are a safe distance away from utility and power lines. Tree-trimming is a type of homeowner maintenance task should be undertaken by qualified professionals, as it can lead to accidentally cutting off the service or power from an overhead line, being electrocuted by an energized line, being struck by an unsecured tree branch, falling off the roof or a ladder, and any number of similar mishaps that the homeowner is not trained to anticipate and avoid.

Animal Damage
Squirrels and raccoons (and roof rats in coastal regions) will sometimes tear through shingles and roof sheathing when they’re searching for a protected area in which to build nests and raise their young. They often attack the roof’s eaves first, especially on homes that have suffered decay to the roof sheathing due to a lack of drip edges or from problems caused by ice damming, because decayed sheathing is softer and easier to tear through. If you hear any activity of wildlife on your roof, check inside your attic for evidence of pest intrusion, such as damaged insulation, which pests may use for nesting material. Darkened insulation generally indicates that excess air is blowing through some hole in the structure, leading the insulation to become darkened by dirt or moisture.

Biological Growth
Algae, moss and lichen are types of biological growth that may be found on asphalt shingles under certain conditions. Some professionals consider this growth destructive, while others consider it merely a cosmetic problem. Asphalt shingles may become discolored by both algae and moss, which spread by releasing airborne spores.

Almost all biological growth on shingles is related to the long-term presence of excess moisture, which is why these problems are more common in areas with significant rainfall and high relative humidity. But even in dry climates, roofs that are shaded most of the time can develop biological growth.

What we commonly call “algae” is actually not algae, but a type of bacteria capable of photosynthesis. Algae appears as dark streaks, which are actually the dark sheaths produced by the organisms to protect themselves from the ultraviolet radiation of the sun. When environmental conditions are right, the problem can spread quickly across a roof.

Algae can feed on mineral nutrients, such as the calcium carbonate in limestone used as asphalt shingle filler. Calcium carbonate also causes asphalt to retain moisture, which also promotes algae growth, so shingles with excessive filler may be more likely to suffer more algae growth. The rate of filler consumption is slow enough that it’s not generally considered a serious problem.

Algae attach to the shingle by secreting a substance that bonds it tightly to the surface. Growth can be difficult to remove without damaging the roof. The best method is prevention. Algae stains can sometimes be lightened in color by using special cleaners. Power-washing and heavy scrubbing may loosen or dislodge granules. Chemicals used for cleaning shingles may damage landscaping. Also, the cleaning process makes the roof wet and slippery, so such work should be performed by a qualified professional.

Moss is a greenish plant that can grow more thickly than algae. It attaches itself to the roof through a shallow root system that can be freed from shingles fairly easily with a brush. Moss deteriorates shingles by holding moisture against them, but this is a slow process. Moss is mostly a cosmetic issue and, like algae, can create hazardous conditions for those who climb on the roof.

Lichens are composite organisms consisting of a fungus and a photosynthetic partner, such as green or blue-green algae. Lichens bond tightly to the roof, and when they’re removed from asphalt shingles, they may take granules with them. Damage from lichen removal can resemble blistering.

“Tobacco-juicing” is the brownish discoloration that appears on the surface of shingles, under certain weather conditions. It’s often temporary and may have a couple of different causes. After especially long periods of intensely sunny days, damp nights and no rain, water-soluble compounds may leach out of the asphalt from the shingles and be deposited on the surface. Tobacco-juicing may also appear under the same weather conditions if the air is especially polluted. Tobacco-juicing won’t harm asphalt shingles, although it may run down the roof and stain siding. Although it’s more common in the West and Southwest, it can happen anywhere that weather conditions are right. You can spray-wash or paint the exterior of the home to remove tobacco-juicing.

Your InterNACHI inspector should investigate signs of roof damage or deterioration before you call a roofing contractor. That way, you’ll know exactly what types of problems should be addressed before you break out the checkbook for repairs

Home Run Inspections, LLC

Oklahoma:  405-905-9175

Info@HomeRunInspections.com

We Cover All the Bases!

Serving the Oklahoma City metro and surrounding areas including Edmond, Yukon, Piedmont, Bethany, El Reno, Tuttle, Mustang, Moore, Norman, Midwest City, Del City, Choctaw, McCloud, Shawnee, Harrah, Newalla, Jones, and more.

Schedule Your Inspections Online at:

Schedule Your Inspection today

Like us on FaceBook

Follow us on Twitter

Follow us on Instagram

#roof #roofmaintenance #homeruninspections #homeinspectors #homeinspectorokc #homeinspectornearme #homeinspector #inspectionservices #realestateagent #realestateinvestment #OKCRealEstate


Bathtubs and Showers

July 18, 2018/in Blog, Home Safety, Homeowner Tools/by Scott Price
Bathtub Shower Combo

Bathtub Shower Combo

Bathtubs
Bathtubs are made from many different types of materials, including enameled cast-iron, porcelain-enameled steel, and plastic. Plastic tubs are made from materials including ABS, PVC, fiberglass, fiberglass-reinforced plastic, acrylic, and cultured-marble acrylic. Bathtubs that are equipped with shower fixtures should be manufactured with slip-resistant surfaces. Bathtubs should have a drainage outlet (tailpiece) with a minimum diameter of 1-1/2 inches. Every tub should be equipped with a stopper. The bathtub should have an overflow outlet installed. The overflow prevents flooding if the tub is being filled while unattended, and prevents overflow of the water when a person enters a tub that is full.

Fire-Resistance
Bathtubs made of plastic are tested for fire ignition.  They are made with fire-resistant chemicals to reduce their fuel contribution in a house fire, or an accidental exposure to a plumber’s torch.

Large Bathtub Loads
Some bathtubs are so large that they can accommodate more than one person at a time.  These larger bathtubs may need special and additional structural support underneath them to adequately support the load.
A 3×4-foot bathtub may have a capacity to hold 200 gallons or more.  The weight of the bathtub, water, and occupants may total over 1 ton, considering:

200 pounds for the bathtub
+ 1,600 pounds of water
+    350 pounds for two people
= 2,150 pounds

A very large tub may cause structural problems because live-loading for a typical residential home is 40 pounds per square foot.  The live load for a 3×4-foot occupied tub may be assumed to be only 480 pounds, but may weigh over 2,000 pounds while it is in use.

Maintenance Tips
The homeowner should make sure that the tub is free of cracks, rust and other staining, and that all edges, gaps and surrounding tile are adequately caulked to ensure that moisture cannot leach behind the tile work and drywall, which can lead to leaks and structural damage behind walls that won’t be evident until the issue becomes extensive and expensive to fix.

Showers
Plastic, pre-fabricated shower units are constructed of various synthetic materials, including ABS, PVC, gel-coated fiberglass-reinforced plastic, cultured marble, cast-filled fiberglass, polyester, cultured marble acrylic, and acrylic.  These shower units are impregnated with fire-retardant chemicals to reduce the fuel contribution during a fire, and protection against an accidental burn by a plumber’s torch.

The showerhead height is not typically regulated by building codes, but the head is commonly installed 70 to 80 inches above the shower floor.

Shower Water Pipes
Water-supply pipes from the shower valve to the showerhead outlet — referred to as the shower riser pipes — whether exposed or not, must be firmly attached to a structural component to prevent the pipes from leaking caused by stress fractures or joint failures.  Movement of the showerhead may move the riser piping, possibly causing failure of the piping.  The risers must be firmly secured.

The common practice for installing the riser pipe is to place a drop-ear elbow at the top of the riser pipe.  The elbow has two wing connections.  They can be screwed to a structural backing board, such as a 2×4.  A pipe strap can be used instead of a drop-ear elbow.  When the riser is exposed, the manufacturer will typically provide a strap or attachment device to match the finish of the fixture and pipe.  The strap or attachment device should be firmly secured to a structural component.

Shower Outlets
The waste outlet for a shower should have minimum diameter of 1-1/2 inches.  The shower outlet should have a strainer that is at least 3 inches in diameter, with dimensional openings in the strainer of at least a 1/4-inch.  The strainer should be removable.

Shower Area
A shower compartment should have an interior cross-sectional area of at least 900 square inches.  This will allow an average-sized adult to clean the lower body while bending over.  A shower that’s any smaller would be inadequately sized.  Shower compartments should be at least 30 inches in minimum dimension.  This measurement is based on the movement of an adult body inside a shower and measured from the finished     interior dimension of the compartment, excluding fixture valves, showerheads, soap dishes and grab bars.  There are exceptions for showers having fold-down seats, and those with compartments at least 25 inches wide and 1,300 square inches in cross-sectional area.

The exception allows for a shower with one dimension being 25 inches, provided the compartment has at least 1,300 square inches of cross-sectional area.  This is useful to contractors and DIY homeowners who remove an old bathtub and install a standup shower fixture in the same space.

Shower Walls
Showers and bathtubs with installed showerheads should be finished with a non-absorbent surface that shall extend to a height of not less than 6 feet above the floor level of the room, or 70 inches above the shower floor.  It should be constructed of smooth, corrosion-resistant and non-absorbent materials to protect the structural components from moisture damage.  The gypsum or cement wallboard behind ceramic tiles of a shower wall should be water-resistant. The water-resistant material is not required in the rest of the bathroom, although it is a common practice to use water-resistant gypsum wallboard in other areas of the bathroom because of the moisture levels.

Shower Access and Egress Opening
Many injuries in a home are related to accidents in the bathtub or shower.  The minimum opening requirements for access and egress allows an adult enough room to safely step into and exit the shower area without having to twist or turn through a narrow opening.  The shower opening (or access and egress opening) should be at least 22 inches of clear and unobstructed finish-width.  The 22-inch width is based on the approximate shoulder width of an average-sized adult, and provides comfortable access to service the valves, showerheads and drain.  It allows for emergency response and rescue access, and emergency egress.

Shower Floors
The shower floor surface must be watertight with smooth, corrosion-resistant, non-absorbent, waterproof materials.  Joints between the floor and walls of the shower must be sealed or flashed to prevent water penetration.  Ideally, there should be some type of slip-resistant floor surface.  The shower floor structure needs proper support by a smooth and structurally sound base.  The base of the shower floor should be designed to support both dead (structural) and live (people and water) loads.

Shower pans and liners are installed under and around showers to prevent moisture intrusion from getting into the structural supports under and behind the shower enclosure.  They must meet specific standards for material, installation and size in order to support both dead and live loads.

Shower Glazing
Glass doors enclosing the shower should be made of safety glazing.  If a window is installed in the shower, the window should be made of safety glazing to provide protection.  If a person slips or falls inside the shower, s/he may be seriously injured by broken glass if the glass is not made of safety glazing.  The safety glazing should be correctly labeled by being permanently marked in a corner, legible and visible after installation, and indoor applications should be marked “indoor use only.”

Maintenance Tips
Similar to other bathroom fixtures, the homeowner should make sure that the shower is free of cracks, rust and other staining, and that all edges, gaps and surrounding tile are adequately caulked to ensure that moisture cannot leach behind the tile work and drywall, which can lead to leaks and structural damage behind walls that won’t be evident until the issue becomes extensive and expensive to fix.  Additionally, if the glazing for the showers doors is damaged, it should be replaced, as cracked glazing can break without notice and cause serious injuries

Home Run Inspections, LLC

Oklahoma:  405-905-9175

Info@HomeRunInspections.com

We Cover All the Bases!

Serving: Oklahoma City, Edmond, Yukon, Piedmont, Bethany, El Reno, Tuttle, Mustang, Moore, Norman, Midwest City, Del City, Choctaw, McCloud, Shawnee, Harrah, Newalla, Jones, and more.

Schedule Your Inspections Online at:

Schedule Now!

Like us on FaceBook

Follow us on Twitter

Follow us on Instagra

#homeruninspections #homeinspectors #homeinspectorokc #homeinspectornearme #inspectionservices #realestateagent #realestateinvestment #OKCRealEstate #bathtub #shower #plumbing


Page 1 of 212

Pages

  • About Us
  • Blog
  • Contact Us
  • For Agents
  • Home
  • Services
  • Testimonials
  • Thank You!
  • What We Inspect
  • Your Report

Categories

  • Autumn Home Maintenance
  • Blog
  • Holidays
  • Home Energy Efficiency
  • Home Inspections
  • Home Safety
  • Homeowner Tools
  • Inspection Day
  • On-Going Home Maintenance
  • Perks
  • Spring Home Maintenance
  • Summer Home Maintenance
  • Uncategorized
  • Winter Home Maintenance

Archive

  • January 2023
  • November 2022
  • October 2022
  • August 2022
  • February 2022
  • January 2022
  • July 2021
  • March 2021
  • February 2021
  • January 2021
  • February 2020
  • January 2020
  • December 2019
  • November 2019
  • October 2019
  • August 2019
  • September 2018
  • August 2018
  • July 2018
  • February 2018
  • November 2017
  • October 2017
  • August 2017
  • July 2017
  • June 2017
  • May 2017
  • April 2017
  • March 2017
  • February 2017
  • January 2017
  • December 2016
  • November 2016
  • October 2016
  • September 2016
  • August 2016
  • July 2016
  • June 2016
  • May 2016
  • April 2016
  • March 2016
  • February 2016
  • January 2016
  • December 2015
  • November 2015

Home Run Inspections, LLC

We are an All-Star Team of Professional Inspectors providing Excellence in Inspection Services to Help You Assess & Maintain the Value of Your Real Estate Investments.

Call Now: (405) 905-9175

Info@HomeRunInspections.com

Oklahoma Service Areas

Proudly providing inspection services to the OKC metro and surrounding areas from Guthrie to Purcell, El Reno to Shawnee, and everything in-between.

Oklahoma Service Areas

Certified Master Inspector

Verify This Certified Master Inspector
© Copyright 2021 Home Run Inspections, LLC - Website by Spectora
  • Link to Mail
  • Link to Facebook
  • Link to X
  • Link to Youtube
  • Link to LinkedIn
  • Link to Yelp
Scroll to top Scroll to top Scroll to top