• Link to Mail
  • Link to Facebook
  • Link to X
  • Link to Youtube
  • Link to LinkedIn
  • Link to Yelp
  • OK: 405-905-9175
Home Run Inspections, LLC
  • Home
  • About Us
  • Services
  • What We Inspect
  • Your Report
  • For Agents
  • Testimonials
  • Blog
  • Contact Us
  • Schedule Now
  • Click to open the search input field Click to open the search input field Search
  • Menu Menu

Roof Maintenance

July 30, 2018/in Autumn Home Maintenance, Blog, Home Safety, Homeowner Tools, On-Going Home Maintenance/by Scott Price

Roof-Covering Maintenance

Although homeowners aren’t necessarily expected to climb on their roofs every season as part of regular home maintenance, there are some conditions that should be monitored to prevent roof damage and to help you get the longest life out of your roof-covering materials. Certain types of damage can lead to water and pest intrusion, structural deterioration, and the escape costly energy. A home inspector will call out these issues on a home inspection.

Weathering
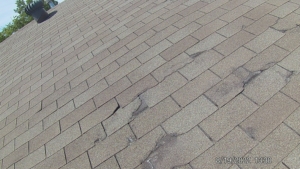
Hail and storm damage, known as weathering, can weaken a roof’s surface even if you haven’t lost any shingles/shakes/slates following a storm. It’s the most common source of environmental damage for roofs. Strong, sustained winds can cause uplift to the edges of shingles and shakes, which can weaken their points of attachment and allow rainwater and melting snow to reach the roof’s underlayment. Wind can also send projectiles through the air, which can damage every surface of the home’s exterior, including the roof. In Oklahoma City especially, you should always inspect your roof after a heavy weather event, as far as it is practical to do so without taking any undue risks, to check whether you have lost any roof-covering materials, or if any parts look particularly weathered or damaged. A small fix now could prevent costly repairs later.

roof with tree damage

Tree Damage at Roof

Tree Damage
Tree damage results from wind-blown tree branches scraping against shingles and from the impact of falling branches blown by wind and/or because the nearby tree has dead branches that eventually break off and fall. Branches that overhang the roof should always be cut back to avoid damage from both abrasion and impact, and to prevent the accumulation of leaf debris on the roof, its valleys, and in the gutters, which will interfere with proper drainage and lead to pooling of rainwater and snowmelt. Of course, it’s especially important to make sure that tree limbs near the home’s roof and exterior are a safe distance away from utility and power lines. Tree-trimming is a type of homeowner maintenance task should be undertaken by qualified professionals, as it can lead to accidentally cutting off the service or power from an overhead line, being electrocuted by an energized line, being struck by an unsecured tree branch, falling off the roof or a ladder, and any number of similar mishaps that the homeowner is not trained to anticipate and avoid.

Animal Damage
Squirrels and raccoons (and roof rats in coastal regions) will sometimes tear through shingles and roof sheathing when they’re searching for a protected area in which to build nests and raise their young. They often attack the roof’s eaves first, especially on homes that have suffered decay to the roof sheathing due to a lack of drip edges or from problems caused by ice damming, because decayed sheathing is softer and easier to tear through. If you hear any activity of wildlife on your roof, check inside your attic for evidence of pest intrusion, such as damaged insulation, which pests may use for nesting material. Darkened insulation generally indicates that excess air is blowing through some hole in the structure, leading the insulation to become darkened by dirt or moisture.

Biological Growth
Algae, moss and lichen are types of biological growth that may be found on asphalt shingles under certain conditions. Some professionals consider this growth destructive, while others consider it merely a cosmetic problem. Asphalt shingles may become discolored by both algae and moss, which spread by releasing airborne spores.

Almost all biological growth on shingles is related to the long-term presence of excess moisture, which is why these problems are more common in areas with significant rainfall and high relative humidity. But even in dry climates, roofs that are shaded most of the time can develop biological growth.

What we commonly call “algae” is actually not algae, but a type of bacteria capable of photosynthesis. Algae appears as dark streaks, which are actually the dark sheaths produced by the organisms to protect themselves from the ultraviolet radiation of the sun. When environmental conditions are right, the problem can spread quickly across a roof.

Algae can feed on mineral nutrients, such as the calcium carbonate in limestone used as asphalt shingle filler. Calcium carbonate also causes asphalt to retain moisture, which also promotes algae growth, so shingles with excessive filler may be more likely to suffer more algae growth. The rate of filler consumption is slow enough that it’s not generally considered a serious problem.

Algae attach to the shingle by secreting a substance that bonds it tightly to the surface. Growth can be difficult to remove without damaging the roof. The best method is prevention. Algae stains can sometimes be lightened in color by using special cleaners. Power-washing and heavy scrubbing may loosen or dislodge granules. Chemicals used for cleaning shingles may damage landscaping. Also, the cleaning process makes the roof wet and slippery, so such work should be performed by a qualified professional.

Moss is a greenish plant that can grow more thickly than algae. It attaches itself to the roof through a shallow root system that can be freed from shingles fairly easily with a brush. Moss deteriorates shingles by holding moisture against them, but this is a slow process. Moss is mostly a cosmetic issue and, like algae, can create hazardous conditions for those who climb on the roof.

Lichens are composite organisms consisting of a fungus and a photosynthetic partner, such as green or blue-green algae. Lichens bond tightly to the roof, and when they’re removed from asphalt shingles, they may take granules with them. Damage from lichen removal can resemble blistering.

“Tobacco-juicing” is the brownish discoloration that appears on the surface of shingles, under certain weather conditions. It’s often temporary and may have a couple of different causes. After especially long periods of intensely sunny days, damp nights and no rain, water-soluble compounds may leach out of the asphalt from the shingles and be deposited on the surface. Tobacco-juicing may also appear under the same weather conditions if the air is especially polluted. Tobacco-juicing won’t harm asphalt shingles, although it may run down the roof and stain siding. Although it’s more common in the West and Southwest, it can happen anywhere that weather conditions are right. You can spray-wash or paint the exterior of the home to remove tobacco-juicing.

Your InterNACHI inspector should investigate signs of roof damage or deterioration before you call a roofing contractor. That way, you’ll know exactly what types of problems should be addressed before you break out the checkbook for repairs

Home Run Inspections, LLC

Oklahoma:  405-905-9175

Info@HomeRunInspections.com

We Cover All the Bases!

Serving the Oklahoma City metro and surrounding areas including Edmond, Yukon, Piedmont, Bethany, El Reno, Tuttle, Mustang, Moore, Norman, Midwest City, Del City, Choctaw, McCloud, Shawnee, Harrah, Newalla, Jones, and more.

Schedule Your Inspections Online at:

Schedule Your Inspection today

Like us on FaceBook

Follow us on Twitter

Follow us on Instagram

#roof #roofmaintenance #homeruninspections #homeinspectors #homeinspectorokc #homeinspectornearme #homeinspector #inspectionservices #realestateagent #realestateinvestment #OKCRealEstate


Furnace Filter Maintenance

July 27, 2018/in Blog, Home Energy Efficiency, Home Safety, On-Going Home Maintenance/by Scott Price

Regular Home Maintenance

Part of responsible homeownership includes, of course, regular home maintenance.  And there are some tasks that, if deferred, can lead to a home system that’s inefficient and overworked, which can result in problems and expenses.  We often see this on our home inspections. One such task is changing the air filter of the home’s HVAC system. Air Filter Maintenance is simple and inexpensive, and taking care of it at least every three months can mean the difference between optimum comfort and avoidable repairs.

What Can Go Wrong
Most homes have some sort of furnace or heat pump, and many of those homes (especially newer ones) have combined heating, ventilation and air-conditioning or HVAC systems.  Each type uses some type of air filter or screen to prevent larger airborne particles (up to 40 microns) from entering the system and clogging sensitive machinery.  A system that has a dirty filter can suffer from pressure drop, which can lead to reduced air flow, or “blow-out,” resulting in no air infiltration at all.  Any of these conditions can cause the system to work harder to keep the home warm or cool (depending on the season and the setting).  And any mechanical component that has to work harder to run efficiently puts undue stress on the whole system, which can lead to premature failure, resulting in repair or replacement.

Also, a dirty filter that’s exposed to condensation can become damp, which can lead to mold growth that can be spread throughout the home by the HVAC system.  This can lead to serious health consequences, not to mention a compromised unit that will likely require servicing and may require replacement, depending on the severity of the moisture problem.

Types of Filters
Most HVAC and furnace filters are disposable.  They are made of biodegradable paper or similar media, and shaped in cells, screens or fins designed to trap as much airborne debris as possible.  Filters can typically be purchased in economical multi-packs, and there are many types that will fit different models of furnace/HVAC units.  It’s important to use the appropriate filter for your unit; using the wrong filter that doesn’t fit the unit properly can create the same types of problems as having a dirty filter.  Your HVAC installer can show you where the filter goes and how to remove the old one and install a new one.  Your unit may also have an affixed label with directions for easy filter replacement.

How Often?
Your HVAC or furnace technician should service your unit once a year.  Because a furnace/HVAC unit contains moving parts, it’s important that belts are not cracked and dry, ventilation ductwork is not gapped, cracked or rusted, and components, such as coils and fans, are clog-free and adequately lubricated for unimpeded operation.  This sort of evaluation is best left to the professional, unless you’ve had the appropriate training.

The filter of the unit, especially if it’s an HVAC unit that will tend to get nearly year-round use, should be changed by the homeowner at least every three months, but possibly more often.

Check your filter’s condition and change it once a month if:

  • You run your unit six months a year to year-round.
  • You have pets.  Pet dander can become airborne and circulate through the home’s ventilation system just as typical household dust does.
  • You have a large family.  More activity means more household dust, dirt and debris.
  • You smoke indoors.
  • You or someone in your household suffers from allergies or a respiratory condition.
  • You live in a particularly windy area or experience high winds for extended periods, especially if there are no nearby shrubs or trees to provide a natural windbreak.
  • You live in an area prone to or having recently experienced any wildfires.  Airborne ash outdoors will eventually find its way indoors.
  • You have a fireplace that you occasionally use.
  • You live on a working farm or ranch.  Dust and dirt that gets kicked up by outdoor work activity and/or large animals will be pulled into the home’s ventilation system, especially through open windows.
  • You have a large garden.  Depending on its size and how often you work it, tilling soil, planting, pulling weeds, using herbicides and pesticides, and even watering mean that dirt, chemicals and condensation can be pulled into your home’s ventilation system.
  • There is construction taking place around or near the home.  You may be installing a new roof or a pool, or perhaps a neighbor is building a home or addition.  Even if the activity is only temporary, dust and debris from worksites adjacent to or near the home can be sucked into the home’s ventilation system, and this increased activity can tax your HVAC system.

Change the filter immediately if:

  • The filter is damaged.  A damaged filter won’t work as intended.
  • The filter is damp.  A filter affected by moisture intrusion, system condensation, or even high indoor humidity can quickly become moldy and spread airborne mold spores throughout the home via the ventilation system.
  • There is evidence of microbial growth or mold on the filter.  Mold spores already infiltrating the home via the HVAC system are not only bad for the unit itself, but they can pose a health hazard for the family, ranging from an irritated respiratory system to a serious allergic reaction.

Tips on Changing the Filter

  • Turn off the unit before replacing the filter.
  • Use the right sized filter for your unit.
  • Follow the directions for your unit to make sure you’re installing the filter properly.  For example, many filters have different colors for the front and back (or upstream and downstream flow) so that they’re not installed backwards.
  • Make sure there aren’t any gaps around the filter frame.  If this is the case, you may have the wrong size filter, or the filter itself may be defective or damaged.
  • Use a rag to clean up any residual dust before and after you replace the filter.
  • Securely replace any levers, gaskets and/or seals.
  • Turn the unit on and observe it while it’s operating to make sure the filter stays in place.
  • Note the date of filter replacement in a convenient location for the next time you inspect it.  A filter that becomes dirty enough to change within a short period of time may indicate a problem with the unit or ventilation system, so monitoring how often the filter requires changing is important information for your technician to have.

Call a technician for servicing if:

  • Your unit fails to turn back on.
  • The fan is slow, making an excessive noise, or the fins are bent.
  • The coils are excessively dusty or clogged.
  • You notice moisture intrusion from an unknown source anywhere in the system.

Homeowners who take care of the easy task of changing their HVAC filter can help prevent system downtime and avoidable expenses. This is an easy way to keep their families living and breathing comfortably.  Your InterNACHI inspector can provide more useful tips and reminders during your Annual Home Maintenance Inspection

Home Run Inspections, LLC

Oklahoma:  405-905-9175

Info@HomeRunInspections.com

We Cover All the Bases!

Serving the Oklahoma City metro and surrounding areas including Edmond, Yukon, Piedmont, Bethany, El Reno, Tuttle, Mustang, Moore, Norman. We also provide services in Midwest City, Del City, Choctaw, McCloud, Shawnee, Harrah, Newalla, Jones, and more.

Also Now Serving the Florida Panhandle metro areas including Destin, Fort Walton Beach, Okaloosa Island, Miramar Beach, Santa Rosa Beach.  We also provide inspections in Niceville, Shalimar, Freeport, Crestview, DeFuniak Springs, Panama City Beach, and more.

Schedule Your Inspections Online at:

Schedule Your Inspection

Like us on FaceBook

Follow us on Twitter

Follow us on Instagra

#homemaintenance #filter #furnacefilter #hvac #homeruninspections #homeinspectors #homeinspectorokc #homeinspectornearme #inspectionservices #realestateagent #realestateinvestment #OKCRealEstate


Preventing Water in Basements

July 24, 2018/in Blog, Home Energy Efficiency, Home Safety, On-Going Home Maintenance/by Scott Price

In Oklahoma City, the biggest concern for homeowners related to their basement and/or crawlspace area is unwanted moisture intrusion.  This can be the result of several factors, which is why homeowners should occasionally check these areas. Preventing water in basements should be job #1 for the home owner.

The basement is typically the area of a home most at risk for water damage because it’s located below grade and surrounded by soil.  Soil releases the water it has absorbed during rain or when snow melts, and the water can end up in the basement through cracks.  Water can even migrate through solid concrete walls via capillary action, which is a phenomenon whereby liquid spontaneously rises in a narrow space, such as a thin tube, or via porous materials.  Wet basements can cause problems that include peeling paint, toxic mold contamination, building rot, foundation collapse, and termite damage.  Even interior air quality can be affected if naturally occurring gases released by the soil are being transmitted into the basement.

Properly waterproofing a basement will lessen the risk of damage caused by moisture or water.  Homeowners should be aware of what they can do to keep their basements and crawlspaces dry and safe from damage.

Prevent water entry.
You can help prevent water from entering the basement by ensuring that it’s diverted away from the foundation.  Poor roof drainage and surface runoff due to gutter defects and improper site grading may be the most common causes of a wet basement.

Here are some measures to use to divert water away from the foundation:

  • Install and maintain gutters and downspouts so that they route all rainwater and snow melt at least 10 feet away from the foundation to prevent pooling near the exterior walls.  At the point where water leaves the downspout, it should be able to flow freely away from the foundation instead of back toward it, and it should not be collecting in standing puddles.  A backsplash and diverter can help with this.
  • The finish grade should be sloped away from the building for 10 to 15 feet.  Low spots that may lead to water pooling near the foundation should be re-graded and evened out.
  • Shallow ditches called swales should be dug if one or more sides of the home face an upward slope.  A swale should slope away from the home for 10 to 15 feet, at which point it can empty into another swale that directs water around to the downhill-side of the property, leading it away from the foundation.

Repair all cracks and holes.
There are several causes of cracks and holes that permit moisture intrusion.  Poor workmanship during the home’s construction is one factor.  Water pressure from the outside can also build up, forcing water through the walls.  The house may have settled, causing cracks in the floor or walls.  As home inspectors we see this all the time. It’s important to repair all cracks and small holes to prevent leaks and floods.  Any large cracks or holes should be evaluated by a professional after consulting with your InterNACHI home inspector.

Here are some steps to take if you suspect that water is entering the basement through cracks or holes:

  • Examine the basement for holes and cracks and for moisture, leaks and discoloration.
  • A waterproof mixture of epoxy and latex cement can be used to fill small hairline cracks and holes.
  • Any cracks larger than about 1/8-inch should be filled with mortar made from one part cement and two parts fine sand, with just enough water to make a fairly stiff mortar.  It should be pressed firmly into all parts of the larger cracks and holes to be sure that no air bubbles or pockets remain.  As long as water is not being forced through the basement walls due to outside pressure, the application of mortar with a standard trowel will be sufficient if special care is taken to fill all cracks completely.
  • If water is being forced through by outside pressure, a slightly different method of patching can be used, involving chiseling out the mouth the crack along its length and cutting a dovetail groove, which is then filled with mortar.  You may wish to defer this type of repair to a masonry professional.
  • Sodium silicate is a water-based mixture that will actually penetrate the substrate by up to 4 inches.  Concrete, concrete block and masonry include lime as a natural component, which reacts with the sodium silicate to produce a solid, crystalline structure that fills in all the microscopic cracks, holes and pores.  No water vapor or gas will be able penetrate via capillary action because the concrete and masonry have now become harder and denser from the sodium silicate.  It is an alkaline substance and, as such, can burn the skin and eyes on contact.  Inhalation can also cause respiratory irritation.  All surfaces receiving this treatment must be prepared, and the several required applications must be thorough.  These are all reasons that this type of work should be performed by a trained professional.

Always have any large cracks evaluated by your InterNACHI inspector before undertaking any repairs yourself or hiring a professional, and check your basement and crawlspace regularly for moisture intrusion.  Adding a De-Humidifier and or a Sump Pump can really be beneficial as well.

Home Run Inspections, LLC

Oklahoma:  405-905-9175

Info@HomeRunInspections.com

We Cover All the Bases!

Serving: Oklahoma City, Edmond, Yukon, Piedmont, Bethany, El Reno, Tuttle, Mustang, Moore, Norman, Midwest City, Del City, Choctaw, McCloud, Shawnee, Harrah, Newalla, Jones, and more.

Schedule Your Inspections Online at:

Schedule Your Home Inspection

Like us on FaceBook

Follow us on Twitter

Follow us on Instagram

#basement #basements #crawlspace #moisture #homeruninspections #homeinspectors #homeinspectorokc #homeinspectornearme #inspectionservices #realestateagent #realestateinvestment #OKCRealEstate

Radon

July 21, 2018/in Blog, Home Safety/by Scott Price

What is it?

Radon is a cancer-causing, radioactive gas. You cannot see, smell or taste. But, it still may be a problem in your home. Although it is a naturally occurring gas in our environment, it is also the second leading cause of lung cancer deaths in the U.S., according to the U.S. Surgeon General. Nearly one out of every 15 homes is estimated to have elevated levels. The Surgeon General and the U.S. Environmental Protection Agency recommend testing all houses. Millions of Americans have already tested their homes for this gas, and you should, too.

Let your InterNACHI inspector test your home.

You cannot predict radon levels based on state, local or neighborhood radon measurements. Do not rely on radon test results from other homes in the neighborhood to estimate the radon level in your own home. Homes that are next to each other can have different radon levels. Carbon Monoxide Detectors and other common devices in homes do not pick up this gas. The only way to find out what your home’s radon level is have a Radon test performed.  Your InterNACHI inspector uses special interference-proof air-canister testing devices that will measure the radon levels in different areas of the home over a limited period of time, which will help determine whether installing a mitigation system is recommended.  A radon mitigation system can aid in continuously and automatically filtering outdoor ground air that enters the home, which will help reduce your home’s radon level.

Water Contamination

If the results of your Indoor Air Quality test show elevated levels of contaminants and your water comes from a private well, have your inspector test your water as well. The devices and procedures for testing  your home’s water supply are different from those used for measuring levels in indoor air. If your water tests positive, this can add to your risk of exposure because the radon can be released into the air during showering and while performing household tasks using water.

Home Run Inspections, LLC

Oklahoma:  405-905-9175

Info@HomeRunInspections.com

We Cover All the Bases!

Serving:  Oklahoma City, Norman, Yukon, Edmond, Piedmont, Bethany, El Reno, Tuttle, Mustang, Moore, Norman, Midwest City, Del City, Choctaw, McCloud, Shawnee, Harrah, Newalla, Jones, and more.

Schedule Your Inspections Online at:

Schedule Your Inspection Today

Like us on FaceBook

Follow us on Twitter

Follow us on Instagra

#homeruninspections #homeinspectors #homeinspectorokc #homeinspectornearme #inspectionservices #realestateagent #realestateinvestment #OKCRealEstate


Bathtubs and Showers

July 18, 2018/in Blog, Home Safety, Homeowner Tools/by Scott Price
Bathtub Shower Combo

Bathtub Shower Combo

Bathtubs
Bathtubs are made from many different types of materials, including enameled cast-iron, porcelain-enameled steel, and plastic. Plastic tubs are made from materials including ABS, PVC, fiberglass, fiberglass-reinforced plastic, acrylic, and cultured-marble acrylic. Bathtubs that are equipped with shower fixtures should be manufactured with slip-resistant surfaces. Bathtubs should have a drainage outlet (tailpiece) with a minimum diameter of 1-1/2 inches. Every tub should be equipped with a stopper. The bathtub should have an overflow outlet installed. The overflow prevents flooding if the tub is being filled while unattended, and prevents overflow of the water when a person enters a tub that is full.

Fire-Resistance
Bathtubs made of plastic are tested for fire ignition.  They are made with fire-resistant chemicals to reduce their fuel contribution in a house fire, or an accidental exposure to a plumber’s torch.

Large Bathtub Loads
Some bathtubs are so large that they can accommodate more than one person at a time.  These larger bathtubs may need special and additional structural support underneath them to adequately support the load.
A 3×4-foot bathtub may have a capacity to hold 200 gallons or more.  The weight of the bathtub, water, and occupants may total over 1 ton, considering:

200 pounds for the bathtub
+ 1,600 pounds of water
+    350 pounds for two people
= 2,150 pounds

A very large tub may cause structural problems because live-loading for a typical residential home is 40 pounds per square foot.  The live load for a 3×4-foot occupied tub may be assumed to be only 480 pounds, but may weigh over 2,000 pounds while it is in use.

Maintenance Tips
The homeowner should make sure that the tub is free of cracks, rust and other staining, and that all edges, gaps and surrounding tile are adequately caulked to ensure that moisture cannot leach behind the tile work and drywall, which can lead to leaks and structural damage behind walls that won’t be evident until the issue becomes extensive and expensive to fix.

Showers
Plastic, pre-fabricated shower units are constructed of various synthetic materials, including ABS, PVC, gel-coated fiberglass-reinforced plastic, cultured marble, cast-filled fiberglass, polyester, cultured marble acrylic, and acrylic.  These shower units are impregnated with fire-retardant chemicals to reduce the fuel contribution during a fire, and protection against an accidental burn by a plumber’s torch.

The showerhead height is not typically regulated by building codes, but the head is commonly installed 70 to 80 inches above the shower floor.

Shower Water Pipes
Water-supply pipes from the shower valve to the showerhead outlet — referred to as the shower riser pipes — whether exposed or not, must be firmly attached to a structural component to prevent the pipes from leaking caused by stress fractures or joint failures.  Movement of the showerhead may move the riser piping, possibly causing failure of the piping.  The risers must be firmly secured.

The common practice for installing the riser pipe is to place a drop-ear elbow at the top of the riser pipe.  The elbow has two wing connections.  They can be screwed to a structural backing board, such as a 2×4.  A pipe strap can be used instead of a drop-ear elbow.  When the riser is exposed, the manufacturer will typically provide a strap or attachment device to match the finish of the fixture and pipe.  The strap or attachment device should be firmly secured to a structural component.

Shower Outlets
The waste outlet for a shower should have minimum diameter of 1-1/2 inches.  The shower outlet should have a strainer that is at least 3 inches in diameter, with dimensional openings in the strainer of at least a 1/4-inch.  The strainer should be removable.

Shower Area
A shower compartment should have an interior cross-sectional area of at least 900 square inches.  This will allow an average-sized adult to clean the lower body while bending over.  A shower that’s any smaller would be inadequately sized.  Shower compartments should be at least 30 inches in minimum dimension.  This measurement is based on the movement of an adult body inside a shower and measured from the finished     interior dimension of the compartment, excluding fixture valves, showerheads, soap dishes and grab bars.  There are exceptions for showers having fold-down seats, and those with compartments at least 25 inches wide and 1,300 square inches in cross-sectional area.

The exception allows for a shower with one dimension being 25 inches, provided the compartment has at least 1,300 square inches of cross-sectional area.  This is useful to contractors and DIY homeowners who remove an old bathtub and install a standup shower fixture in the same space.

Shower Walls
Showers and bathtubs with installed showerheads should be finished with a non-absorbent surface that shall extend to a height of not less than 6 feet above the floor level of the room, or 70 inches above the shower floor.  It should be constructed of smooth, corrosion-resistant and non-absorbent materials to protect the structural components from moisture damage.  The gypsum or cement wallboard behind ceramic tiles of a shower wall should be water-resistant. The water-resistant material is not required in the rest of the bathroom, although it is a common practice to use water-resistant gypsum wallboard in other areas of the bathroom because of the moisture levels.

Shower Access and Egress Opening
Many injuries in a home are related to accidents in the bathtub or shower.  The minimum opening requirements for access and egress allows an adult enough room to safely step into and exit the shower area without having to twist or turn through a narrow opening.  The shower opening (or access and egress opening) should be at least 22 inches of clear and unobstructed finish-width.  The 22-inch width is based on the approximate shoulder width of an average-sized adult, and provides comfortable access to service the valves, showerheads and drain.  It allows for emergency response and rescue access, and emergency egress.

Shower Floors
The shower floor surface must be watertight with smooth, corrosion-resistant, non-absorbent, waterproof materials.  Joints between the floor and walls of the shower must be sealed or flashed to prevent water penetration.  Ideally, there should be some type of slip-resistant floor surface.  The shower floor structure needs proper support by a smooth and structurally sound base.  The base of the shower floor should be designed to support both dead (structural) and live (people and water) loads.

Shower pans and liners are installed under and around showers to prevent moisture intrusion from getting into the structural supports under and behind the shower enclosure.  They must meet specific standards for material, installation and size in order to support both dead and live loads.

Shower Glazing
Glass doors enclosing the shower should be made of safety glazing.  If a window is installed in the shower, the window should be made of safety glazing to provide protection.  If a person slips or falls inside the shower, s/he may be seriously injured by broken glass if the glass is not made of safety glazing.  The safety glazing should be correctly labeled by being permanently marked in a corner, legible and visible after installation, and indoor applications should be marked “indoor use only.”

Maintenance Tips
Similar to other bathroom fixtures, the homeowner should make sure that the shower is free of cracks, rust and other staining, and that all edges, gaps and surrounding tile are adequately caulked to ensure that moisture cannot leach behind the tile work and drywall, which can lead to leaks and structural damage behind walls that won’t be evident until the issue becomes extensive and expensive to fix.  Additionally, if the glazing for the showers doors is damaged, it should be replaced, as cracked glazing can break without notice and cause serious injuries

Home Run Inspections, LLC

Oklahoma:  405-905-9175

Info@HomeRunInspections.com

We Cover All the Bases!

Serving: Oklahoma City, Edmond, Yukon, Piedmont, Bethany, El Reno, Tuttle, Mustang, Moore, Norman, Midwest City, Del City, Choctaw, McCloud, Shawnee, Harrah, Newalla, Jones, and more.

Schedule Your Inspections Online at:

Schedule Now!

Like us on FaceBook

Follow us on Twitter

Follow us on Instagra

#homeruninspections #homeinspectors #homeinspectorokc #homeinspectornearme #inspectionservices #realestateagent #realestateinvestment #OKCRealEstate #bathtub #shower #plumbing


Bathroom Sinks (Lavatories)

July 15, 2018/in Blog, Home Safety, Homeowner Tools/by Scott Price

green bathroom sink

Lavatories
A lavatory is a washbasin or sink located in a bathroom or washroom.  “Lavatory” means washbasin or sink, and is derived from the Latin word lavatorium, which means washing vessel, and the French word laver, meaning “to wash.” As a home inspector in Oklahoma City, I can confirm that sinks come in a variety of shapes and sizes(and colors).  They are available in enameled cast-iron, vitreous china, stainless steel, porcelain-enameled formed steel, plastic, and non-vitreous ceramic.  They can be wall-mounted, hanger-mounted, under-mounted, pedestal, rimmed, and above-center basin types.
Countertops integrated with lavatories are constructed of a variety of materials, including ABS, PVC, gel-coated fiberglass-reinforced plastic, acrylic, polyester, and cultured marble.  Plastic vanity tops should be impregnated with fire-resistant chemicals to reduce the fuel contribution of the lavatory during a house fire or the accidental fire from a plumber’s torch.  They are also made to resist the effect of a burning cigarette left unattended on the vanity top.

Lavatories should have a waste outlet of at least 1-1/4 inches in diameter.  Each lavatory must have a strainer, a pop-up stopper, a crossbar, or other mechanism to prevent items such as rings, toothbrushes and cosmetic items from dropping into the drain.

Lavatory Overflows
Former standards required lavatories to have an overflow, but that is no longer the case.  The overflow is now an option of the manufacturer.  The reason for not requiring an overflow at a lavatory is because of the lack of use of the overflow, which can cause bacterial and micro-organism growth.

Where a lavatory does have an overflow installed, the cross-sectional area of the overflow should be a minimum of 1-1/8 inches; anything larger can promote bacterial and micro-organism growth.  The overflow should be able to prevent overflowing of the sink for a minimum of five minutes when tested from the onset of water flowing into the overflow’s opening.

Maintenance Tips
There are many different designs of lavatories, including artisanal styles that sit up on the vanity, rather than being dropped into a recessed cavity in the vanity or countertop.  Regardless of the style or whether it includes an overflow opening, the washbasin should be securely attached to the vanity, be free of cracks and other defects, and have gaps that are properly caulked to prevent moisture buildup, which can lead to unsanitary conditions, including mold growth

Home Run Inspections, LLC

Oklahoma:  405-905-9175

Info@HomeRunInspections.com

We Cover All the Bases!

Serving: Oklahoma City, Edmond, Yukon, Piedmont, Bethany, El Reno, Tuttle, Mustang, Moore, Norman, Midwest City, Del City, Choctaw, McCloud, Shawnee, Harrah, Newalla, Jones, and more.

Schedule Your Inspections Online at:

Schedule Your Inspection Today!

Like us on FaceBook

Follow us on Twitter

Follow us on Instagra

#plumbing #homemaintenance #homeruninspections #homeinspectors #homeinspectorokc #homeinspectornearme #inspectionservices #realestateagent #realestateinvestment #OKCRealEstate


Toilets

July 12, 2018/in Blog, Home Safety, Homeowner Tools/by Scott Price

Toilet Measurements
A toilet has a water consumption limit of a maximum average of 1.6 gallons of water per flush. The general bowl rim height above the floor is between 14 and 15 inches.  Other rim heights may be needed for water closets used by children (10 inches), and the elderly and persons with physical disabilities (18 inches).  Elongated water closet bowls are required for public or employee use but are often installed in homes.  An elongated bowl is 2 inches longer than a regular bowl.

Defects at Toilets
The water closet (toilet) may have a clogged drain.  While flushing the toilet, watch the flush performance, and use toilet paper as part of this test.  There should be no excessive odors around the water closet.  Check the flooring around the toilet with your foot.  Using the side of your leg, check to see if the toilet is securely attached to the floor.  If it wobbles, the screws at the base may be loose, or the wax ring that adheres the fixture to the waste pipe may be worn or of the wrong size.  If so, it should be replaced.  As home inspectors we check for this and catch it all the time. Look for dampness around the bottom of the toilet base.  Toilets sometimes run continuously.  Check for a water shut-off valve.  Some toilets are mistakenly connected to the hot water system.  Tank lids are often cracked.  Any defective parts should be immediately replaced to avoid backup flooding.

  • Home Run Inspections, LLCOklahoma:  405-905-9175Info@HomeRunInspections.com

    We Cover All the Bases!

    Serving: Oklahoma City, Edmond, Yukon, Piedmont, Bethany, El Reno, Tuttle, Mustang, Moore, Norman, Purcell, Midwest City, Del City, Choctaw, McCloud, Shawnee, Harrah, Newalla, Jones, and more.

    Schedule Your Inspections Online at:

    Schedule Your Inspection Today!

    Like us on FaceBook

    Follow us on Twitter

    Follow us on Instagram

    #homeruninspections #homeinspectors #homeinspectorokc #homeinspectornearme #inspectionservices #realestateagent #realestateinvestment #OKCRealEstate #plumbing #homemaintenancetips


Water Heaters

July 9, 2018/in Blog, Home Safety, Homeowner Tools, On-Going Home Maintenance/by Scott Price

The Water Heater

A water heater is an appliance that heats potable water and supplies heated water to the home’s plumbing distribution system.  Most tanks in Oklahoma City are insulated steel cylinders with an enamel coating on the inner surface. They are referred to as glass-lined tanks. The lining helps prevent corrosion.  A water heater can literally explode if it’s not installed properly. There are standards that regulate the materials, design and installation of water heaters and their related safety devices. Certification marks on them from approved agencies indicate compliance with approved standards.

Conventional residential water heaters have life expectancies that vary greatly.  The typical water heater has a lifespan of about 10 years, based on the following factors: correct installation; usage volume; construction quality; and maintenance.

Correct Installation
A water heater should be installed upright. Installing a water heater on its side will place structural stress on it due to inadequate support for the heater and its pipes, and may cause premature failure.  As a Home Inspector personally performing over 1500 inspections-I’ve never seen that. Water heaters should be installed in well-ventilated areas — not just for fire safety requirements and nitrous-oxide buildup, but also because poor ventilation can shorten its lifespan.  A water heater should also not be placed in an area susceptible to flood damage. Water can rust out the exterior and pipes, decreasing the life expectancy and efficiency of the unit.  A water heater is best placed in an easily accessible area for maintenance.  It should also be readily visible for fire and health-hazard requirements.

Usage
The life expectancy of the water heater depends a great deal on the volume of water used. Using large quantities of water means that the water heater will have to work harder to heat the water. In addition, the greater the volume of water, the greater the corrosive effect of the water will be on the tank materials, pipes, etc.

Construction Quality
As with most household systems and components, you get what you pay for in a water heater. Cheaper models will generally have a shorter lifespan, while more expensive models will generally last longer. A good indication of a water heater’s construction quality is its warranty.  Longer warranties naturally imply sound construction. According to a 2007 Consumer Report that deconstructed 18 different models of water heaters, it was determined that models with longer warranties were of superior manufacturing quality, with nine- and 12-year models typically having larger or higher-wattage heating elements, as well as thicker insulation. Models with larger heating elements have a much better resistance to mineral buildup or scum.

Pay attention to the model’s features.  For example, porcelain casing provides an additional layer of protection against rusting, and a greater level of heat insulation. Some models come with a self-cleaning feature that flushes the pipes of mineral deposit buildup, which can affect the unit’s lifespan.  Models with larger or thicker anodes are better-equipped to fight corrosion.

Maintenance and Parts Replacement
The hardness of the water is another consideration when looking at estimating the lifespan of a water heater.  In areas where there is a higher mineral content to the water, water heaters have shorter a lifespan than in other areas, as mineral buildup reduces the units’ efficiency. Even in areas where the water is softer, however, some mineral deposition is bound to occur.  A way to counteract this mineral buildup is to periodically flush the water heater system, which not only removes some of the buildup, but, in tank systems, the process heats the water in the tank. Higher-end models typically come equipped with a self-flushing feature.  In models for which manual flushing is required, it is important not to damage the water heater valve, which is usually made of plastic and is easy to break.

Although an older model may appear to be well-maintained, a question arises:  Is the maintenance worth it? Warranties often exclude labor costs, so a good rule to follow is that if the total repair cost per year is greater than 10% of the cost of buying and installing a new water heater, it is probably not worth replacing any damaged parts

Home Run Inspections, LLC

Oklahoma:  405-905-9175

Info@HomeRunInspections.com

We Cover All the Bases!

Serving: Oklahoma City, Edmond, Yukon, Piedmont, Bethany, El Reno, Tuttle, Mustang, Moore, Norman, Midwest City, Del City, Choctaw, McCloud, Shawnee, Harrah, Newalla, Jones, and more.

Schedule Your Inspections Online at:

Schedule Your Inspection Today!

Like us on FaceBook

Follow us on Twitter

Follow us on Instagra

#plumbing #waterheater #homeruninspections #homeinspectors #homeinspectorokc #homeinspectornearme #inspectionservices #realestateagent #realestateinvestment #OKCRealEstate


Dryer Vent Safety

July 6, 2018/in Blog, Home Energy Efficiency, Home Safety/by Scott Price

The Numbers

Dryer vent safety can prevent house fires. House fires caused by dryers are far more common than are generally believed. According to the National Fire Protection Agency, fires caused by dryers in 2005 were responsible for approximately 13,775 house fires, 418 injuries, 15 deaths, and $196 million in property damage. Most of these incidents occur in residences and are the result of improper lint cleanup and maintenance. Fortunately, these fires are very easy to prevent. Our home inspectors probably call out dirty dryer vents on 90% of the homes we see.

The Process

Clothes dryers evaporate the water from wet clothing by blowing hot air past them while they tumble inside a spinning drum. Heat is provided by an electrical heating element or gas burner. Some heavy garment loads can contain more than a gallon of water that will become airborne water vapor and leave the dryer and home through an exhaust duct, more commonly known as the dryer vent.

Requirements

A vent that exhausts damp air to the home’s exterior has a number of requirements:
• It should be connected. The connection is usually behind the dryer but may it be under it. Look carefully to make sure it’s actually connected.
• It should not be restricted. Dryer vents are often made from flexible plastic or metal duct, which may be easily kinked or crushed where they exit the dryer and enter the wall or floor. This is often a problem since dryers tend to be tucked away into small areas with little room to work. Vent hardware is available that is designed to turn 90 degrees in a limited space without restricting the flow of exhaust air. Air flow restrictions are a potential fire hazard.
• One of the reasons that restrictions pose a fire hazard is that, along with water vapor evaporated out of wet clothes, the exhaust stream carries lint – highly flammable particles of clothing made of cotton, wool and polyester. Lint can accumulate in an exhaust duct, reducing the dryer’s ability to expel heated water vapor, which then accumulates as heat energy within the machine. As the dryer overheats, a subsequent mechanical failure can trigger a spark, which can cause the lint trapped in the dryer vent to burst into flames. This condition can cause the whole house to catch fire (Fire Safety for the Home ). Fires generally originate within the dryer but spread by escaping through the ventilation duct.

Problems & Tips

If your dryer vent terminates in the crawlspace or attic, it can deposit moisture there.  this is a common problem in many homes in Oklahoma City. Trapped moisture can encourage the growth of mold, wood decay, and other structural problems. The vent may also terminate just under the attic ventilators. We see this a lot with Bathroom Ventilation Systems. This also a defective installation. Make sure your dryer vent terminates at the exterior and away from any doors and windows.  This will ensure exhausted air does not re-enter the home. Also, the end of the dryer vent should have a free-moving damper installed to keep out birds and other pests that like to build nests in this warm environment. Remove any screen which can block lint and other debris. If it’s safety accessible, make sure your dryer vent is unobstructed and that the damper works properly

Home Run Inspections, LLC

Oklahoma:  405-905-9175

Info@HomeRunInspections.com

We Cover All the Bases!

Serving:Oklahoma City, Edmond, Yukon, Piedmont, Bethany, El Reno, Tuttle, Mustang, Moore, Norman, Midwest City, Del City, Choctaw, McCloud, Shawnee, Harrah, Newalla, Jones, and more.

Schedule Your Inspections Online at:

Schedule Today

Like us on FaceBook

Follow us on Twitter

Follow us on Instagram

#dryerventcleaning #dryer #homeruninspections #homeinspectors #homeinspectorokc #homeinspectornearme #inspectionservices #realestateagent #realestateinvestment #OKCRealEstate


Indoor Air Quality

July 3, 2018/in Blog, Home Safety, On-Going Home Maintenance/by Scott Price


Indoor air quality is generally worse than most people believe, but there are things you can do about it.

Some Quick Facts:

  • Indoor air quality can be worse than that of outdoor air.
  • Problems can arise from moisture, insects, pets, appliances, radon, materials used in household products and furnishings, smoke, and other sources.
  • Effects range from minor annoyances to major health risks.
  • Remedies include ventilation, cleaning, moisture control, inspections, and following manufacturers’ directions when using appliances and products.
  • Many homes are built or remodeled more tightly, without regard to the factors that assure fresh and healthy indoor air circulation. Many homes today also contain furnishings, appliances and products that can affect indoor air quality.

Signs of indoor air quality problems include:

  • Unusual and noticeable odors
  • Stale or stuffy air and a noticeable lack of air movement
  • Dirty or faulty central heating or air-conditioning equipment
  • Damaged flue pipes and chimneys
  • Unvented combustion air sources for fossil-fuel appliances
  • Excessive humidity
  • Presence of molds and mildew
  • Adverse health reactions after remodeling, weatherizing, bringing in new furniture, using household and hobby products
  • Feeling noticeably healthier outside

Common Sources of Air Quality Problems:
Poor indoor air quality can arise from many sources. At least some of the following contaminants can be found in almost any home:

  • Moisture and biological pollutants, such as molds, mildew, dust mites, animal dander, and cockroaches
  • High humidity levels, inadequate ventilation, and poorly maintained humidifiers and air conditioners
  • Combustion products, including carbon monoxide from unvented fossil-fuel space heaters, unvented gas stoves and ovens, and back-drafting from furnaces and water heaters
  • Formaldehyde from durable-press draperies and other textiles, particleboard products, such as cabinets and furniture framing, and adhesives used in composite wood furniture and upholstery
  • Radon, which is a radioactive gas from the soil and rock beneath and around the home’s foundation, groundwater wells, and some building materials
  • Household products, such as paints, solvents, air fresheners, hobby supplies, dry-cleaned clothing, aerosol sprays, adhesives, and fabric additives used in carpeting and furniture, which can release volatile organic compounds (VOCs);
    asbestos, which is found in most homes more than 20 years old. Sources include deteriorating, damaged and disturbed pipe insulation, fire retardant, acoustical ceiling tiles, and floor tiles
  • Lead from lead-based paint dust, which is created when removing paint by sanding, scraping or burning
  • Particulates from dust and pollen, fireplaces, wood stoves, kerosene heaters, and unvented gas space heaters
  • Tobacco smoke, which produces particulates, combustion products and formaldehyde

Tips for Homeowners:

  • Ask about formaldehyde content before buying furniture, cabinets and draperies.
  • Promptly clean and dry water-damaged carpet, or remove it altogether.
  • Vacuum regularly, especially if you have pets, and consider using area rugs instead of wall-to-wall carpeting. Rugs are easier to remove and clean, and the floor underneath can also be easily cleaned.
  • Eliminate unwanted moisture intrusion by checking for sources (such as holes and cracks in the basement and other areas, and leaks from appliances), and by using a dehumidifier.
  • Open windows and use fans to maintain fresh air with natural and mechanical air circulation.
  • Always open the flue damper before using the fireplace. This will also prevent carbon-monoxide poisoning.
  • If your air conditioner has a water tray, empty and clean it often during the cooling season.
  • If you smoke, smoke outdoors and away from any windows and doors.
  • Use the range vent above your stove whenever you cook.
  • Use the bathroom vent whenever you use the bathroom.
  • Don’t leave vehicles or lawn care equipment running in your garage. Make sure the door leading from the home to the garage has a door sweep to help keep out vapors.

Your InterNACHI home inspector can recommend more ways to help you maintain healthy indoor air quality for you and your family

Home Run Inspections, LLC

Oklahoma:  405-905-9175

Info@HomeRunInspections.com

We Cover All the Bases!

Serving the Oklahoma City metro and surrounding areas including Edmond, Yukon, Piedmont, Bethany, El Reno, Tuttle, Mustang, Moore, Norman, Midwest City, Del City, Choctaw, McCloud, Shawnee, Harrah, Newalla, Jones, and more.

Schedule Your Inspections Online at:

Schedule Now

Like us on FaceBook

Follow us on Twitter

Follow us on Instagra

#homeruninspections #homeinspectors #homeinspectorokc #homeinspectornearme #inspectionservices #realestateagent #realestateinvestment #OKCRealEstate #oklahomahomeinspector #homeinspectornormanok


Pages

  • About Us
  • Blog
  • Contact Us
  • For Agents
  • Home
  • Services
  • Testimonials
  • Thank You!
  • What We Inspect
  • Your Report

Categories

  • Autumn Home Maintenance
  • Blog
  • Holidays
  • Home Energy Efficiency
  • Home Inspections
  • Home Safety
  • Homeowner Tools
  • Inspection Day
  • On-Going Home Maintenance
  • Perks
  • Spring Home Maintenance
  • Summer Home Maintenance
  • Uncategorized
  • Winter Home Maintenance

Archive

  • January 2023
  • November 2022
  • October 2022
  • August 2022
  • February 2022
  • January 2022
  • July 2021
  • March 2021
  • February 2021
  • January 2021
  • February 2020
  • January 2020
  • December 2019
  • November 2019
  • October 2019
  • August 2019
  • September 2018
  • August 2018
  • July 2018
  • February 2018
  • November 2017
  • October 2017
  • August 2017
  • July 2017
  • June 2017
  • May 2017
  • April 2017
  • March 2017
  • February 2017
  • January 2017
  • December 2016
  • November 2016
  • October 2016
  • September 2016
  • August 2016
  • July 2016
  • June 2016
  • May 2016
  • April 2016
  • March 2016
  • February 2016
  • January 2016
  • December 2015
  • November 2015

Home Run Inspections, LLC

We are an All-Star Team of Professional Inspectors providing Excellence in Inspection Services to Help You Assess & Maintain the Value of Your Real Estate Investments.

Call Now: (405) 905-9175

Info@HomeRunInspections.com

Oklahoma Service Areas

Proudly providing inspection services to the OKC metro and surrounding areas from Guthrie to Purcell, El Reno to Shawnee, and everything in-between.

Oklahoma Service Areas

Certified Master Inspector

Verify This Certified Master Inspector
© Copyright 2021 Home Run Inspections, LLC - Website by Spectora
  • Link to Mail
  • Link to Facebook
  • Link to X
  • Link to Youtube
  • Link to LinkedIn
  • Link to Yelp
Scroll to top Scroll to top Scroll to top