• Link to Mail
  • Link to Facebook
  • Link to X
  • Link to Youtube
  • Link to LinkedIn
  • Link to Yelp
  • OK: 405-905-9175
Home Run Inspections, LLC
  • Home
  • About Us
  • Services
  • What We Inspect
  • Your Report
  • For Agents
  • Testimonials
  • Blog
  • Contact Us
  • Schedule Now
  • Click to open the search input field Click to open the search input field Search
  • Menu Menu

Nightlights

August 30, 2018/in Home Safety/by Scott Price

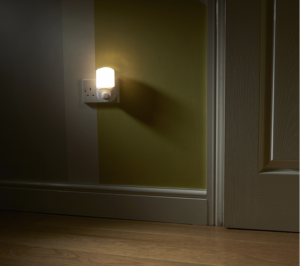
Nightlights are  small, low-powered electrical light source placed for comfort or convenience in indoor areas that become dark at night.

Facts and Figures

  • Before they were powered electrically, nightlights were usually long-burning candles placed in fireproof metal cups, known as tealights in some countries. (Tealights in the U.S. refer to very short and wide candles that can be purchased within or without an aluminum tin cup that are commonly used inside a decorative glass holder.  They are also known as votive candles.) 
  • There are roughly 90 million nightlights purchased each year in the United States. In 2001 alone, more than 600,000 of them were recalled by manufacturers for safety reasons. 
  • Defective nightlights can cause fires, burns and electrocution. 

Uses

Nightlights are typically installed to create a sense of security and to alleviate fears of the dark, especially for children. They also illuminate the general layout of a room without causing the eyestrain created by a standard light, helping to prevent tripping down stairs and over objects. This is an important safety measure for older adults, for whom falls are the leading cause of injury-related deaths, according to the National Association for Home Care and Hospice. Nightlights may also be used to mark an emergency exit.

Types

A wide variety of nightlights is available to homeowners; bulbs vary from incandescent to energy-efficient options, such as light-emitting diodes (LEDs), neon lamps, and electroluminescent bulbs. Some of these devices are equipped with a light-sensitive switch that activates the light only when it’s dark enough for them to be required, saving electricity and the effort needed to manually turn them on and off. Some designs also incorporate a rechargeable battery so they will continue to function during power outages.

Hazards

Nightlights present the following hazards:

  • Nightlights can become excessively hot, causing them to melt and pose a risk of fire if they come in contact with flammable materials, according to the U.S. Consumer Product Safety Commission (CPSC). The CPSC receives roughly 10 reports annually of fires that were caused when nightlights ignited toilet paper, pillows, bedspreads and other flammable materials.
  • A falling blanket or pillow case can start a fire when they come in contact with a hot nightlight.
  • Place nightlights a safe distance from bed coverings, curtains, and other potentially flammable objects and materials. Nightlights should not covered with tape, cardboard or any other material that might cause them to overheat.
  • So-called “bubble” nightlights are special, decorative nightlights that contain a dangerous chemical called methylene chloride. If the vial breaks, the unit should be thrown away immediately and precautions should be taken to avoid skin contact with the leaking chemical; and 
  • electric shock. Nightlights pose the risk of electric shock when used outdoors or in locations that may become wet, such near sinks, hot tubs, in garages, and at covered patios. They should never be plugged into an extension cord, surge-protector strip, multiple-outlet strip, or other movable types of receptacles. Electric shock is also possible if the nightlight overheats and melts.

Additional Tips 

  • Plug the nightlight into an exposed wall outlet where it will be well-ventilated. 
  • Do not repair any nightlight yourself.  Only replace the bulb. 
  • Avoid installing nightlights in locations where they might be exposed to excessive sunlight, as UV rays will degrade the plastic. 
  • Never let children handle nightlights. If you have small children, avoid purchasing or installing a nightlight decorated with cute or funny figures to which they may be attracted and that may be easy for them to reach.Scott Price-Certified Master Inspector
    Home Run Inspections
    405-905-9175
    Info@HomeRunInspections.com
    We cover all of the bases!
  • Serving:  Oklahoma City, Norman, Yukon, Edmond, Piedmont, Bethany, El Reno, Tuttle, Mustang, Moore, Norman, Midwest City, Del City, Choctaw, McCloud, Shawnee, Harrah, Newalla, Jones, and more.
  • Online at:Home Run Inspections

    Follow us on 

    Like us on FaceBook
    Follow us on Twitter

    Follow us on Instagram: Instagram 


Trash Compactors

August 27, 2018/in Home Safety, Homeowner Tools, On-Going Home Maintenance/by Scott Price

Why Use a Trash Compactor?
Permanently installed residential trash compactors run on electricity and use a small hydraulic system to crush trash down to a fraction of its original volume (sometimes down to 25%) in order to reduce the amount of non-biodegradable waste regularly generated by a household.  Smaller and narrower than a dishwasher, they are a standard kitchen appliance in new-construction homes.

How They Work
Trash compactors have three main components:  the motor; the ram; and the trash container drawer.  The motor runs using household electricity, which activates the ram that is operated using hydraulics.  Units vary by size, quality and cost.  The loading capacity for the average home unit is generally around 25 gallons, and the compacting force can range between 2,000 pounds to 5,000 pounds, depending on type and quality.

Most units must be at least half full in order to work properly.  To use the unit, non-food refuse should be placed or stacked neatly at the bottom of the drawer.  When it is at least half full, the unit can be activated so that the ram compacts the drawer’s contents.

Safely Disposing of Household Trash
Generally, bottles, cans, cardboard, paper and plastic items and the like can be conveniently disposed of in a trash compactor.  In order to minimize odors, containers that once held food and beverages should be rinsed before being placed in the drawer.

Trash compactors require the use of specially-fitted bags that, once filled, easily lift out of the unit for disposal or trash pickup.

Perishable food items can stain the unit’s interior and create unnecessary mess and foul odors, which is why they should not be disposed of in a trash compactor.  These types of items should be discarded using a garbage disposal or food grinder, or recycled as compost waste.

Additionally, hazardous materials should never be placed in a trash compactor, as crushing them can have unintended consequences that can damage the unit, create an unsafe environment, and/or cause negative health effects.  These include batteries, cigarette butts (which may not be fully extinguished), household rags used with toxic substances, cans and containers that held hazardous liquids and chemicals (as residue can spill out and cause damage or negative health effects), and similar items.  These should be wrapped and disposed of separately, or recycled according to local guidelines or ordinances.

Safety Precautions and Sensors
As a safety precaution, trash must never be stuffed down into the bottom of the drawer with one’s hands or feet, as this can dent or offset the drawer and its rollers, as well as damage the hydraulics. Rough use and frequent misuse can lead to chronic problems with the unit and its components.

Caution should be used when removing filled bags, as items that have been crushed may create sharp protrusions.  Many people wear gloves while removing bags for disposal.

The unit should always be locked, even when not in use.  Curious children may wish to pull open the drawer and hide inside, or activate the unit, which is why they should never be left unattended around an unlocked trash compactor.

Spills around the unit should be immediately cleaned up for safety as well as hygienic reasons.  Because trash compactors use electricity, spilled water or other liquids can cause the unit to short out or create an unsafe hazard for users.

Trash compactors have built-in safeguards, such as locks, misload sensors, tilt sensors, and drawer-monitor switches, which are designed to help prevent injury, over-filling and under-filling, as well as detect when trash has been accidentally placed within the unit but outside the drawer (such as behind the drawer where the ram and hydraulics are located).  However, because they are constructed of many mechanical parts and electrical wiring, trash compactors can malfunction and chronically break down if not used and maintained properly.
Repairs and replacing parts should be performed by a qualified professiona

Home Run Inspections
405-905-9175, 850-203-3239
Info@HomeRunInspections.com
We cover all of the bases!

Serving: Oklahoma City, Edmond, Yukon, Moore, Norman, Purcell, Midwest City/Del City, Bethany, El Reno, Shawnee, Harrah, and more.

Schedule your inspections now Online at:

Schedule Now!

Follow us on 

Like us on FaceBook
Follow us on Twitter

Follow us on Instagram: Instagram 


Garbage Disposals

August 24, 2018/in Home Inspections, Home Safety, Homeowner Tools, On-Going Home Maintenance/by Scott Price

What Are Food-Waste Disposers?
Garbage disposals, also called food-waste disposers, are residential appliances designed to shred food waste so that it can fit through plumbing. They are usually electrically powered (although occasionally powered by water pressure) and are installed beneath sinks. As a home inspector, we always inspect this appliance.

Why Use a Garbage Disposal?
When food waste is discarded into the trash, it places an enormous burden on waste-management systems. Garbage disposals reduce the severity of these problems by routing food waste into septic systems or sewers instead of landfills.

Garbage Disposals and Septic Systems
If a garbage disposal discharges into a septic tank, it can place significant strain on the septic system. We really don’t see this in Oklahoma City very much. The amount of waste that enters the tank, particularly grease and suspended solids, will increase considerably. This load increase requires that the septic tank be pumped more often than would otherwise be required. The additional strain will also reduce the lifespan of the septic system. Septic systems can be designed to accommodate food waste, but, in general, they are not.

Electrical Wiring Requirements

  • The National Electrical Code (NEC) does not require a garbage disposal to have GFCI protection.
  • The vibration caused by the operation of a garbage disposal can cause electrical connections to separate. Check for any loose connections in the wire compartment box at the base of the disposal.
  • Garbage disposals should be either hardwired or connected to an outlet through a grounded electrical outlet.
  • A dedicated circuit is generally recommended, although a circuit that is shared with a dishwasher is sometimes appropriate. The disposal’s user or installation manual should be consulted.

Precautions for Testing Garbage Disposals:

  • To test a garbage disposal for leaks, turn it on and run water through it. The water load should be great enough so that any leaks will become apparent. A good way to do this is to close the drain and fill the sink with water before releasing the stopper.
  • While testing a garbage disposal, never put anything other than water through it. Before turning it on, check to make sure there are no objects already in the disposal.
  • If a dishwasher is connected to the disposal, make sure that the line that connects them is securely attached.
  • Check to make sure that the garbage disposal is connected to a drain that is 1½ inches or greater in diameter.
  • Check to make sure that the disposal is provided with an adequate water supply.
  • If the home has a double sink, check to make sure the waste pipe from the disposal has a trap installed.

Maintenance and Operation Suggestions:

  • Put only small quantities of food into the disposal at a time. Large food scraps should be cut into smaller pieces before entering the disposal.
  • Never put anything down the disposal that is not food or water. Bottle caps, aluminum foil, and other non-food items can damage the disposal or get stuck in the plumbing piping.
  • Run water while using the disposal and for approximately 30 seconds after you turn it off. Food scraps will flow through the piping more easily if they are pushed along by water. Cold water is better than warm water for this purpose because it will force fats and grease to congeal and harden, allowing them to move more easily through pipes. Warm water can be run through the disposal while it is not in operation.
  • Ice can be used to clear off solidified grease and other debris from the blades in a garbage disposal.

The garbage disposal should be used to grind only non-fibrous, leftover food. If in doubt as to whether something can be put in the disposal, err on the side of caution and put it in the trash instead.
The following items should never be put in a disposal:

  • items that are hard enough to dull the blades, such as shells from shellfish or bones;
  • food that is highly fibrous, such as corn husks, artichokes, pineapples, potato peels, asparagus, or celery, which should enter a disposal only in small quantities or disposed of in the trash. These foods take a long time to grind and can clog the disposal or the plumbing;
  • grease and household oils; or
  • chemicals.

Garbage disposals have the potential to limit the amount of household trash that must be taken away to waste management facilities. They can also place additional strain on septic systems and, for this reason, they should be used infrequently

Home Run Inspections, LLC

Oklahoma:  405-905-9175

Info@HomeRunInspections.com

We Cover All the Bases!

Serving: Oklahoma City, Norman, Yukon, Piedmont, Purcell, Bethany, El Reno, Tuttle, Mustang, Moore, Edmond, Midwest City, Del City, Choctaw, McCloud, Shawnee, Harrah, Newalla, Jones, and more.

Schedule Your Inspections Online at:

Schedule Now

Florida Scheduler 

Like us on FaceBook

Follow us on Twitter

Follow us on Instagram


Dishwashers

August 21, 2018/in Blog, Home Energy Efficiency, Home Safety, Homeowner Tools, On-Going Home Maintenance/by Scott Price

How Does a Dishwasher Work?
Dishwashers are labor-saving and water-conserving appliances that were first invented in the U.S. in the 1850s.  There are both portable units and permanently installed units that are found in most homes today.
Home Inspectors always inspect dishwashers. Permanently installed dishwashers rely on the home’s electrical and plumbing systems, which is why their proper operation and maintenance are critical to household safety and trouble-free use.

A dishwasher operates with sprayed water using multiple cycles of washing and rinsing, followed by drying, using hot, forced circulated air.  These cycles may be further distinguished according to length of cycle, power and temperature.

Dishwashers are plugged into a dedicated electrical receptacle at the back of the unit, and usually plumbed into the home’s hot water supply, although the cold water supply is also an option.  This assures that the dishwasher’s load is optimally washed and rinsed using the maximum recommended temperature range of between 130°  F and 170° F.

The dimensions of an average unit are 24×24 inches, although deluxe models may be wider and/or deeper to accommodate larger loads.  Its interior components are typically made of stainless steel and/or plastic, and the exterior door may be metal, enamel-covered metal, or having a wood or wood-like veneer to match the decor of the kitchen cabinets.

Use, Maintenance and Precautions
Dishwasher-safe glasses, cups, plates, bowls, pots, pans and utensils, as well as some ceramic-ware and cutlery, are loaded into pull-out racks and baskets.  They can be safely washed and rinsed in cycles that vary in intensity and length.

Many users rinse, soak or pre-treat cookware to remove solids and excess food waste before loading it in the dishwasher; this is a matter of personal preference, as well as how well the unit works on everyday and heavy-duty loads, although waste that cannot be adequately drained should be removed from dishware before the soiled items are loaded into the unit.

Dishwashers can also be used to effectively disinfect toothbrushes, infants’ plastic toys, formula bottles and synthetic nipples, and teething rings, as well as other household and personal hygiene items. However, extremely soiled items that come into contact with potentially hazardous or toxic materials, such as tools, gardening implements and the like, should not be washed in a dishwasher, as the toxic residue may not fully rinse out of the interior, which can contaminate future loads of dishware and utensils, as well as clog plumbing lines.

Soaps, pre-treaters and rinsing agents to prevent or eliminate water spots are available in a variety of costs, quality and effectiveness.  They also come in both powder and liquid form.  Regardless of the type of detergent used, it should be specifically for dishwasher use only, as other soaps can leave behind residue, as well as create excess foam and leaks.

Maintenance is relatively easy and can be done by running the unit through a hot-water cycle while it is empty, but this is only suggested following an especially dirty load where residue has not fully washed and drained for some reason.

Dishwashers should never be overloaded.  Loads should be distributed and racked such that cleaning will be effective.  It is recommended that plastic items be loaded into the unit’s top rack to avoid their coming into contact with hot elements in the unit’s bottom and then melting, or being jostled by the power of the sprayers and subsequently blocking them, which may prevent the water from reaching the unit’s entire load.

It is important to monitor the unit for failure to fully drain, as well as for leaks, excessive noise and movement, and burning smells, which can indicate a burned-out motor, an issue with the plumbing connected to the unit, or a problem with its original installation.  A qualified professional should evaluate a malfunctioning unit and perform any repairs

Home Run Inspections
405-905-9175
Info@HomeRunInspections.com
We cover all of the bases!

Serving:  Oklahoma City, Edmond, Yukon, Moore, Norman, Purcell, Midwest City/Del City, Bethany, El Reno, Shawnee, Harrah, and more.

Schedule your inspections now Online at:

Click to Schedule Now

Follow us on 

Like us on FaceBook
Follow us on Twitter

Follow us on Instagram: Instagram 


Kitchen Sink

August 18, 2018/in Blog, Home Safety, Homeowner Tools, On-Going Home Maintenance/by Scott Price

Sinks are a category of plumbing fixtures that includes kitchen sinks, service sinks, bar sinks, mop sinks and wash sinks. A sink is considered a different item than a lavatory (or a bathroom sink), although the terms are often used interchangeably. Sinks can be made of enameled cast-iron, vitreous china, stainless steel, porcelain-enameled formed steel, non-vitreous ceramic, and plastic materials.

Sink waste outlets should have a minimum diameter of 1-1/2 inches. Most kitchen sinks have an opening of 3-1/2 inches in diameter. A food-waste grinder has a standard opening of 3-1/2 inches, and so do most kitchen sink basket strainers. A strainer or crossbar should be provided to restrict the clear opening of the waste outlet.

Plumbing Requirements for Garbage Disposals
Food-waste grinders (also known as garbage disposals and disposers) are designed to grind foods, including bones, into small-sized bits that can flow through the drain line. Using them to dispose of fibrous and stringy foods, such as corn husks, celery, banana skins and onions, is not recommended because fibers tend to pass by the grinder teeth, move into the drain pipe, and cause drains to clog.

Water must be supplied to the grinder to assist during its operation in transporting waste. The water flushes the grinder chamber and carries the waste down the drainpipe. Blockage may result if the grinder is used without running the water during operation. Grinders should be connected to a drain of not less than 1-1/2 inches in diameter. Food-waste grinders are supplied with water from the sink faucet. They do not add to the load used to compute drainage pipe sizing. The drain size required for a grinder is consistent with that for a kitchen sink.

Plumbing Requirements for Dishwashers
The water supply to a residential dishwasher should be protected against backflow by an air gap or backflow preventer. The machine must be equipped with an integral backflow mechanism, or the potable water supply must have either a backflow preventer or an air gap. The discharge pipe from the dishwasher should be increased to a minimum of 3/4-inch in diameter. It should be connected with a wye fitting to the sink tailpiece. Before connecting to the sink tailpiece, the dishwasher waste line should rise and be securely fastened to the underside of the counter. The combined discharge from a sink, dishwasher, and waste grinder is allowed to discharge through a single 1-1/2-inch trap.

Maintenance Tips
Homeowners should take care not to overload the garbage disposal or the dishwasher, as this can lead to leaks and backups in the sink and the plumbing system.  A backup at the kitchen sink may mean that the garbage disposal is clogged, or the plumbing line has some obstruction that prevents proper drainage.  It’s important that homeowners understand the cause of the problem, as well as the proper way to repair it, before dismantling pipes under the sink.  The right size of fittings and replacement parts, as well as proper drainage (including slope and traps) will ensure that the sink will work as it should following a repair, which is why most maintenance issues are best left to professionals, unless the homeowner has the proper instruction, parts and tools available.

Home Run Inspections, LLC

Oklahoma:  405-905-9175

Info@HomeRunInspections.com

We Cover All the Bases!

Serving: Oklahoma City, Edmond, Yukon, Piedmont, Bethany, El Reno, Tuttle, Mustang, Moore, Norman, Purcell, Midwest City, Del City, Choctaw, McCloud, Shawnee, Harrah, Newalla, Jones, and more.

Schedule Your Inspections Online at:

Click Here to Schedule Now!

Like us on FaceBook

Follow us on Twitter

Follow us on Instagram


Roof Vents

August 15, 2018/in Home Energy Efficiency, Home Safety, On-Going Home Maintenance/by Scott Price

Roof Covering

Homeowners don’t generally want to climb on their roofs to check roof vents and its general condition unless they’ve experienced a major storm or other issue that prompts them to investigate.  This is smart because, as untrained non-professionals, homeowners are at greater risk for accidents and injuries than pros.

But it’s useful for homeowners to know what they’re likely to find if they do climb their roof. We recommend having  someone else climb it, such as an insurance adjuster or a home inspector. This should provide some idea of what components are there and what they do, as well as when those components are damaged and creating problems down below.

The proper term for anything that pokes out of the surface of the roof is known as a roof penetration.  Whether it’s a chimney, skylight or vent pipe, it falls under that category.  There are important elements related to the installation of all roof penetrations that prevent their premature deterioration. This is to ensure your roof and the structure under it stay dry and problem-free.

Vents Types

The most common type of roof penetration are vents. Every home has them. Vents are installed to expel gas or moisture of some sort from an appliance or area inside the house.  Vents are also called flues.

Here are the most common types and their functions:

  • Exhaust vents or mechanical ventilation allow the escape of damp air and odors from a bathroom, clothes dryer, and from the range above a stove in order to prevent the buildup of condensation.
  • Each plumbing drainpipe in the home is connected to a plumbing stack vent. This ensures the appliance’s proper drainage by preventing back-siphoning, which can pull noxious vapors and sewer gases back into the home.  One important aspect of their installation is that they should not be located with 3 feet of an openable window so that these gases don’t get sucked back into the home.
  • Vents installed in the attic space are known as roof vents or turtle vents. They release hot air that can build up inside the attic as a result of heat rising from the living space below.  Venting this hot air is important to prevent the premature deterioration of the roofing materials. This can overheat and lose adhesion or delaminate shingles.  It can also form condensation which can also affect wooden structural members and insulation.
  • Combustion vents are installed for fuel-burning appliances, such as a furnace, boiler, water heater, gas range, fireplace—any appliance that burns fuel for its operation, such as gas, propane, oil, wood, etc. They exhaust the toxic byproducts of combustion to the outdoors.

Vent Material

Vents can be made of galvanized steel, such as a dryer vent.  PVC is appropriate to use as plumbing stack vents, depending on the appliance. Some vents may have caps or hoods to prevent rainwater from entering them such as a dryer vent. There are also vent-like roof penetrations that are actually air intakes, such as for a furnace, which aid proper combustion.

Vents can be double-walled or single-wall, depending on their purpose.  Combustion vents tend to be double-walled.  Some vents serve multiple items or appliances, but they tend to be of the same type.  A vent that serves more than one plumbing fixture needs to be larger in order to move the gas at an appropriate rate.

Problems with Combustion Vents

If installed properly, vents tend to operate problem-free, but poor installation or materials can lead to issues, such as leaks, corrosion, and insufficient ventilation.  That’s when the problems can affect the living space and appliances below.  The most common issues occur with combustion vents.

To work effectively, a combustion vent has to draw adequately, which is the natural process that moves hot exhaust gases up and out the exhaust flue or vent. Another way to say it is that the vent needs to have a good draft. The effectiveness of the draft is influenced by several factors.

These factors include:

  • thermal buoyancy, which is the tendency of hot air to rise. The hotter the gas is, the faster it will rise;
  • unrestricted flow, which means that the exhaust flue can’t be too small or have too many bends, since these two things slow the flow; and
  • proper length. If a flue is too long, the gases will cool and condensation will form. Condensation can cause corrosion of the sheet metal exhaust flue, as well as the furnace’s components.

Vent Height 

An important factor in the quality of the draft is adequate clearance above the roof.  This generally means that the vent should follow either the manufacturer’s installation recommendations or the “2-10 Rule” required by most building code regulations for chimney terminations.  The 2-10 Rule states that combustion vents should terminate at least 2 feet above any part of the highest part of the roof, including the roof itself, within 10 feet.  For example, if a combustion vent is 3 feet away from a dryer vent on a flat roof, the combustion vent should be two feet higher than the dryer vent.  If a combustion vent is on the low part of a sloping roof, the vent must be 2 feet higher than the nearest point of the sloped roof that’s within 10 feet.  So, if you see a vent that doesn’t meet the 2-10 Rule, a qualified HVAC contractor may need to re-install a vent of the proper height.

White deposits on combustion vents or on the roof below them are evidence that excessive condensation has been forming. Causes include:

  • is too long;
  • has too many bends; or
  • has poorly sloped sections that slow the flow of exhaust gases.

If you see this condition on a roof, you should look for similar white deposits on the combustion appliance served by the vent. Poor venting can cause corrosion that may shorten the lifespan of that appliance.

Flashing for Vents

Flashing keeps moisture and the elements from entering the roof surface down the side of the vent.  Different types of vents require flashing that is appropriate for the type of vent installation, as well as of a compatible material so that it doesn’t cause galvanic corrosion or other issues that will cause the vent or flashing to deteriorate prematurely.  Flashing should be on top of roof shingles or below stone tiles. A good roofing contractor who specializes in your roof’s material will install it properly.

Of course, a leak in the attic, or any signs of rust or staining on the vent, flashing or roof is a sign of a problem.  If you do suspect a problem, your first call should be to your home inspector so that he can investigate it before you call a contractor.  Most contractors are honest, but since the contractor has something to sell, and it’s in his best interests to find a problem that he can charge you to fix.  Call your InterNACHI home inspector first; it’s his job to find the problem, not fix it

Home Run Inspections, LLC

Oklahoma:  405-905-9175

Info@HomeRunInspections.com

We Cover All the Bases!

Serving: Oklahoma City, Edmond, Yukon, Piedmont, Bethany, El Reno, Tuttle, Mustang, Moore, Norman, Purcell, Midwest City, Del City, Choctaw, McCloud, Shawnee, Harrah, Newalla, Jones, and more.

Schedule Your Inspections Online at:

Click Here to Schedule Today

Like us on FaceBook

Follow us on Twitter

Follow us on Instagram


Cracks in Masonry Walls

August 11, 2018/in Blog, Home Safety, On-Going Home Maintenance/by Scott Price

Exterior Wall Covering

Regardless of the type of cladding covering the exterior of homes, most homes’ foundations in Oklahoma City are built using a reinforcing metal structure covered by some kind of concrete or masonry.  Over time, cracks in masonry walls may develop.  If your home has a masonry foundation (including masonry walls), here are some things to know, especially if you notice the development of any defects, cracks, or moisture intrusion in your crawlspace or basement.

Every homeowner should occasionally check the exterior of their home and the foundation, especially if there have been severe weather or geological events, such as heavy rains, flooding, or seismic activity, or nearby construction or industrial work that creates noticeable vibration, such as roadwork, the installation of oil or gas wells or pipeline, etc.

Before looking at the exterior, it’s useful to know which walls are load-bearing and which are not. Usually, this can be done by examining the beams and joists in the basement, crawlspace or attic. Also, note whether the walls are solid masonry or masonry-cavity, non-structural brick, or stone veneer. The overall quality of the building’s construction, and often that of its neighborhood, will be a good indicator of the condition of your home’s masonry.

All exposed masonry should be inspected for the following:

  • cracking;
  • spalling, which is the chipping or flaking of concrete, bricks or other masonry when improper drainage or venting and freeze-thaw weather cycling exists;
  • bowing, which is the term used to describe vertical bulging;
  • sweeping, which is horizontal bulging;
  • leaning; and
  • mortar deterioration.

Masonry Cracks

Although masonry can deform elastically over long periods of time to accommodate small amounts of movement during freeze-thaw cycles, large movements can cause masonry cracking, which may appear along the mortar joints or through the masonry units.

Cracking can result from a variety of problems:

  • differential settlement of the foundation;
  • drying shrinkage (particularly in a concrete block foundation);
  • expansion and contraction due to ambient thermal and moisture variations;
  • improper support over door and window openings, which is the effect of freeze-thaw cycles;
  • the corrosion of iron and steel wall reinforcement;
  • differential movement between building materials;
  • the expansion of salts in the cement mixture;
  • efflorescence,  which is the white powder that forms on the surface of concrete/masonry walls as a result of water evaporation (and a cosmetic issue only); and
  • the bulging or leaning of walls.

Testing

Most common masonry wall cracks are caused by thermal or moisture expansion. Active cracks can be sealed with a flexible sealant.  Inactive cracks may be pointed, which is the process of filling joints between masonry units or bricks with mortar.  Some of this work should be undertaken by a masonry professional.

If there are evident or suspected problems, two methods of testing are sometimes useful for assessing masonry. This first test should be performed by a qualified masonry contractor.  Probe holes can be drilled through the joints or masonry units with a masonry bit and probed with a stiff wire (or a fiber optic camera) to determine a wall’s thickness and the adequacy of its mortar. The probe holes are then patched after the investigation has been completed.

A hammer test can be used to determine the structural soundness of masonry units and their bond to the mortar. In a hammer test, the masonry is tapped lightly with a hammer, and the resonance of the sound produced is evaluated. Individual bricks can be replaced and the mortar re-pointed, as damaged bricks cannot be repaired.  If re-pointing, the new mortar should be of the same composition as the existing mortar to prevent deterioration.

Historically Speaking

There may be a substantial difference in the masonry walls in buildings built during the last 40 to 50 years compared to those constructed earlier. Walls became thinner as designers began to more effectively exploit the compressive strength of masonry. This was done by using higher-strength masonry materials and mortars. But this change came at the expense of flexibility; as such, today’s masonry walls and foundations are often more brittle than their massive ancestors and, therefore, particularly susceptible to stress-induced damage.  As home inspectors we encourage homeowners to be vigilant with their homeowner maintenance plan by occasionally checking the condition of their home’s foundation, along with any masonry walls.

Home Run Inspections, LLC

Oklahoma:  405-905-9175

Info@HomeRunInspections.com

We Cover All the Bases!

Serving: Oklahoma City, Edmond, Yukon, Piedmont, Bethany, El Reno, Tuttle, Mustang, Moore, Norman, Purcell, Midwest City, Del City, Choctaw, McCloud, Shawnee, Harrah, Newalla, Jones, and more.

Schedule Your Inspections Online at:

Click Here to Schedule Inspection Today

Like us on FaceBook

Follow us on Twitter

Follow us on Instagram

#construction #homeruninspections #masonry #homeownership #homeinspection #homeinspector #realestateinvesting

Vinyl Siding

August 8, 2018/in Blog, Home Energy Efficiency/by Scott Price

Vinyl Siding-Before and After

There are many different types of cladding or covering a home inspector may see for the exterior of homes that give them their particular style and appeal.  Different cladding types have their own particular pros and cons, as well as maintenance issues.  Here are some facts and tips for homeowners whose homes have vinyl siding.

Homeowners, remodeling contractors and builders often choose vinyl siding as an alternative to wood and aluminum because it’s attractive, durable, easy to maintain, and cost-effective.  Vinyl siding is made with PVC (polyvinyl chloride) and is often textured to resemble wood or stone in a variety of colors.  Vinyl siding came into use as an exterior cladding in the late 1950s.  Today, it’s the most common choice for exterior cladding.

Advantages:

  • Vinyl siding is very durable.
  • It will last for decades when properly installed and maintained.
  • It will not fade.
  • It will not rust.
  • The outer layer contains pigment that adds color to the siding and resists breakdown from UV radiation from sunlight.  If scratched, the siding will reveal the same color as the unscratched exterior, so minor imperfections are not too noticeable.
  • As long as the siding has been properly installed, maintenance is very simple, limited mostly to spray-washing once a year or whenever necessary.

Disadvantages:

  • In extreme weather conditions, vinyl siding is susceptible to damage, as is any other type of siding.
  • In severe cold, vinyl siding can become brittle and more susceptible to cracking.
  • Extreme heat can also cause vinyl to melt or distort.  There are reported cases of sunlight reflected from nearby windows that has caused vinyl siding to warp and melt.
  • Vinyl siding is not a form of insulation—it is simply an exterior cladding.  However, some salespeople misrepresent this fact with claims that new siding will aid energy efficiency.  This is only true for siding that includes special insulating inserts or backings—not to the vinyl siding itself.
  • Vinyl siding is not a watertight covering, so check the inside occasionally for water intrusion if you’ve experienced heavy weather.
  • If a fire occurs, vinyl siding will melt or burn and may release toxic chemicals, making the situation more dangerous for the home’s occupants.  Some green advocates believe that PVC itself can have a negative impact on health, and there is much debate about these claims.

Tips for Homeowners:

  • Properly installed panels and accessories should move freely from side to side.
  • Drainage holes or slots in horizontal vinyl siding allow water behind the siding to drain and should not be covered or caulked.
  • Ripples in the siding can result from stapling or nailing through the face of the siding, which is an incorrect installation.  Distortion and buckling of panels may be caused by fasteners that were not driven straight and level.  If this happens, the homeowner should consult their builder’s warranty.
  • Exterior lights and other features should not be attached directly to the vinyl siding.  They should be secured to mounting blocks instead, since fasteners penetrating the siding will restrict the siding’s natural expansion and contraction.  Always use corrosion-resistant fasteners for any exterior installation.
  • Power-wash the exterior as often as necessary.
  • Check the condition of vinyl gutters and downspouts at least once a year.  While vinyl siding can last for 60 years, gutters and downspouts last around half as long, when properly installed and maintained.
    Info@HomeRunInspections.com

    We Cover All the Bases!

    Serving: Oklahoma City, Edmond, Yukon, Piedmont, Bethany, El Reno, Tuttle, Mustang, Moore, Norman, Midwest City, Del City, Choctaw, McCloud, Shawnee, Harrah, Newalla, Jones, and more.

    Schedule Your Inspections Online at:

    Click Here to Schedule Your Home Inspection Now

    Like us on FaceBook

    Follow us on Twitter

    Follow us on Instagram

#exteriorsiding #vinylsiding #construction #homeruninspections #masonry #homeownership #homeinspection #homeinspector #realestateinvesting

Attic Access Pull-Down Stairs

August 5, 2018/2 Comments/in Blog, Home Energy Efficiency, Home Safety, On-Going Home Maintenance/by Scott Price

Attic Access Pull-Down Stairs
An attic pull-down ladder, also called an attic pull-down stairway or stairs, is a collapsible ladder that’s permanently attached to the attic floor. It’s used to access the attic without being required to use a portable ladder, which can be unstable, as well as inconvenient. They certainly make a home inspectors life easier.

Common Defects
In Oklahoma City, it’s typical for the home builder, rather than the home owner, to install the attic pull-down stairs.  As a home inspector we often find issues with these stairs. They rarely meet safety standards and are prone to a number of defects.

Some of the more common defective conditions include:

  • Cut bottom cord of structural truss. The homeowner may have cut through a structural member while installing a pull-down ladder, unknowingly weakening the structure. Structural members should not be modified without an engineer’s approval;
  • Fastened with improper nails or screws. Drywall or deck screws may be used instead of the standard 16d penny nails or ¼x3-inch lag screws. Nails and screws that are intended for other purposes may have reduced shear strength and may not support the pull-down ladder;
    fastened with an insufficient number of nails or screws. Manufacturers provide a certain number of nails with instructions that they all be used, and they do this for a good reason;
  • Lack of insulation. The attic hatch or door is not likely to be weatherstripped and/or insulated, which will allow air from the attic to flow freely into the living space of the home, and this will cause the heating or cooling system to run overtime. An attic hatch cover box can be installed to increase energy savings;
  • Loose mounting bolts, which is typically caused by age, although improper installation will hasten the loosening process;
  • Attic pull-down ladders that are cut too short. The stairs should reach the floor;
  • Attic pull-down ladders that are cut too long. This causes pressure at the folding hinge, which can cause breakage;
  • Improper or missing fasteners
  • Compromised fire barrier (when the attic and access are above an attached garage);
  • Attic ladder frame that is not properly secured to the ceiling opening; and
  • Closed ladder that is covered with debris, such as blown insulation or roofing material shed during roof work.
  • Cracked steps. This defect is a problem with wooden ladders.


Safety Tips:
If yours is a sliding pull-down ladder, there is a potential for it to slide down too quickly, which can lead to an injury. Always pull the ladder down slowly and cautiously.
Do not allow children to enter the attic unattended. The lanyard attached to the attic stairs should be short enough that children cannot reach it. Parents can also lock the attic ladder so that a key or combination is required to access it.
If possible, avoid carrying large loads into the attic. While a properly installed stairway will safely support an adult, it might fail if you’re carrying a very heavy load. Many trips can be made to reduce the total weight load, if possible.
Replace an old, rickety wooden ladder with a new one. The newer aluminum models are lightweight, sturdy and easy to install. If you do install a new ladder, follow the manufacturer’s instructions to the letter, and test the ladder’s operation before actually using it.

Click Here for More Information

Home Run Inspections, LLC

Oklahoma:  405-905-9175

Info@HomeRunInspections.com

We Cover All the Bases!

Serving: the Oklahoma City, Edmond, Yukon, Piedmont, Bethany, El Reno, Tuttle, Mustang, Moore, Norman, Midwest City, Del City, Choctaw, McCloud, Shawnee, Harrah, Newalla, Jones, and more.

Schedule Your Inspections Online at:

Schedule Your Inspection Here

Like us on FaceBook

Follow us on Twitter

Follow us on Instagra

#homeruninspections #homeinspectors #homeinspectorokc #homeinspectornearme #inspectionservices #realestateagent #realestateinvestment #OKCRealEstate


Attic Insulation

August 2, 2018/in Blog, Home Energy Efficiency, Home Safety, On-Going Home Maintenance/by Scott Price

Controlling Heat Movement

Heating and cooling costs can be slashed by up to 30% per year by properly sealing and having adequate attic insulation in the home. Insulating the attic should be a top priority for preventing heat loss because during cool seasons, as heat rises, a critical amount of heat loss from the living areas of the home occurs through an unfinished attic. During the summer months, heat trapped in the attic can reduce the home’s ability to keep cool, forcing the home’s cooling system to work overtime.

What to Check

As home inspectors we often see the lack of adequate ventilation in insulated attics is a common problem. Ensuring that there is a free flow of outside air from the soffits to the roof vents is key to a well-functioning insulation system. Look behind the baffles to see if there is any misplaced insulation obstructing the natural air flow, and check the roof vents to make sure that outside air is exhausting properly. Also, look for spots where the insulation is compacted; it may need to be fluffed out. If loose-fill insulation is installed, check for any thinly spread areas that may need topping up. Finally, look for dark spots in the insulation where incoming air is admitting wind-blown dust and moisture into the material. Any unintended openings or holes caused by weathering or pest damage should be repaired first.

Installing Attic Insulation

The objective in an attic insulation project is to insulate the living space of the house while allowing the roof to retain the same temperature as the outdoors. This prevents cold outside air from traveling through the attic and into the living area of the home. In order to accomplish this, an adequate venting system must be in place to vent the roof by allowing air flow to enter through soffit-intake vents and out through ridge vents, gable vents or louver vents.

If there is currently a floor in the attic, it will be necessary to pull up pieces of the floor to install the insulation. In this case, it will be easier to use a blower and loose-fill insulation to effectively fill the spaces between the joists. If you choose to go with blown-in insulation, you can usually get free use of a blower when you purchase a certain amount of insulation.

When installing fiberglass insulation, make sure that you wear personal protective equipment, including a hat, gloves, goggles and a face mask, as stray fiberglass material can become airborne, which can cause irritation to the lungs, eyes and exposed skin.

The process

Before you begin actually installing the insulation, there is some important preparation involved in order to ensure that the insulation is applied properly to prevent hazards and to achieve maximum effectiveness.

Step 1: Install Roof Baffles
Install polystyrene or plastic roof baffles where the joists meet the rafters order to maintain the free flow of outside air.

Step 2: Place Baffles Around Electrical Fixtures
Next, place baffles around any electrical fixtures (lights, electrical receptacles, etc.), since these may become hot while in use. Hold the baffles in place by cross-sectioning the rafters with 2x4s placed at a 3-inch clearance around the fixture. Cut the polystyrene board to fit around the fixture and inside the wood square you have just created.

Step 3: Install a Vapor Barrier
If you are installing insulation with a vapor barrier, make sure it faces the interior of the house. Another option for a vapor barrier is to take sheets of plastic and lay them between the ceiling joists. Then, using a staple gun, tack them to the sides of the joists.

Step 4: Apply the Insulation
Begin by cutting long strips of fiberglass to measure, and lay them in between the joists. Do not bunch or compress the material; this will reduce the insulative effect.

Considerations for Attic Flooring

A second layer of insulation will make it easier to obtain the recommended R-value. In colder climates, use an R-value of 49 for adequate attic insulation. In warmer climates, use and R-value of 30. Fiberglass insulation has an R-value of roughly R-3 per inch of thickness; cellulose has an R-value of roughly R-4 per inch, but it doesn’t retain its R-value rating as well as fiberglass.

If an attic floor is in place, it will be easier to use a blower to add cellulose insulation into the spaces. The best way to achieve this is to carefully select pieces of the floor and remove them in a manner such that you will have access to all of the spaces in between the joists. Run the blower hose up into the attic. A helper can control the blower. Blow the insulation into the spaces between the joists, taking care not to blow insulation near electrical fixtures. Replace any missing flooring pieces.

Loose-fill insulation, either fiberglass or cellulose, is also a good option in cases where there is no attic floor. In such circumstances, you won’t need a blower; you can simply place the insulation between the joists by hand. You may also wish to even out the spread with a notched leveler

For more information Click Here

Home Run Inspections, LLC

Oklahoma:  405-905-9175

Info@HomeRunInspections.com

We Cover All the Bases!

Serving: Oklahoma City, Edmond, Yukon, Piedmont, Bethany, El Reno, Tuttle, Mustang, Moore, Norman, Midwest City, Del City, Choctaw, McCloud, Shawnee, Harrah, Newalla, Jones, and more.

Schedule Your Inspections Online at:

Click Here to Schedule Your Home Inspection Today!

Like us on FaceBook

Follow us on Twitter

Follow us on Instagra

#homeruninspections #homeinspectors #homeinspectorokc #homeinspectornearme #homeinspector #inspectionservices #realestateagent #realestateinvestment #OKCRealEstate #attic #atticinsulation #insulation


Pages

  • About Us
  • Blog
  • Contact Us
  • For Agents
  • Home
  • Services
  • Testimonials
  • Thank You!
  • What We Inspect
  • Your Report

Categories

  • Autumn Home Maintenance
  • Blog
  • Holidays
  • Home Energy Efficiency
  • Home Inspections
  • Home Safety
  • Homeowner Tools
  • Inspection Day
  • On-Going Home Maintenance
  • Perks
  • Spring Home Maintenance
  • Summer Home Maintenance
  • Uncategorized
  • Winter Home Maintenance

Archive

  • January 2023
  • November 2022
  • October 2022
  • August 2022
  • February 2022
  • January 2022
  • July 2021
  • March 2021
  • February 2021
  • January 2021
  • February 2020
  • January 2020
  • December 2019
  • November 2019
  • October 2019
  • August 2019
  • September 2018
  • August 2018
  • July 2018
  • February 2018
  • November 2017
  • October 2017
  • August 2017
  • July 2017
  • June 2017
  • May 2017
  • April 2017
  • March 2017
  • February 2017
  • January 2017
  • December 2016
  • November 2016
  • October 2016
  • September 2016
  • August 2016
  • July 2016
  • June 2016
  • May 2016
  • April 2016
  • March 2016
  • February 2016
  • January 2016
  • December 2015
  • November 2015

Home Run Inspections, LLC

We are an All-Star Team of Professional Inspectors providing Excellence in Inspection Services to Help You Assess & Maintain the Value of Your Real Estate Investments.

Call Now: (405) 905-9175

Info@HomeRunInspections.com

Oklahoma Service Areas

Proudly providing inspection services to the OKC metro and surrounding areas from Guthrie to Purcell, El Reno to Shawnee, and everything in-between.

Oklahoma Service Areas

Certified Master Inspector

Verify This Certified Master Inspector
© Copyright 2021 Home Run Inspections, LLC - Website by Spectora
  • Link to Mail
  • Link to Facebook
  • Link to X
  • Link to Youtube
  • Link to LinkedIn
  • Link to Yelp
Scroll to top Scroll to top Scroll to top